FTMRTT is an Android app (available from Google Play Store)
for localization using
a mobile phone and Wi-Fi access points.
You provide the positions of three or more
Wi-Fi access points (APs) and it will dynamically indicate
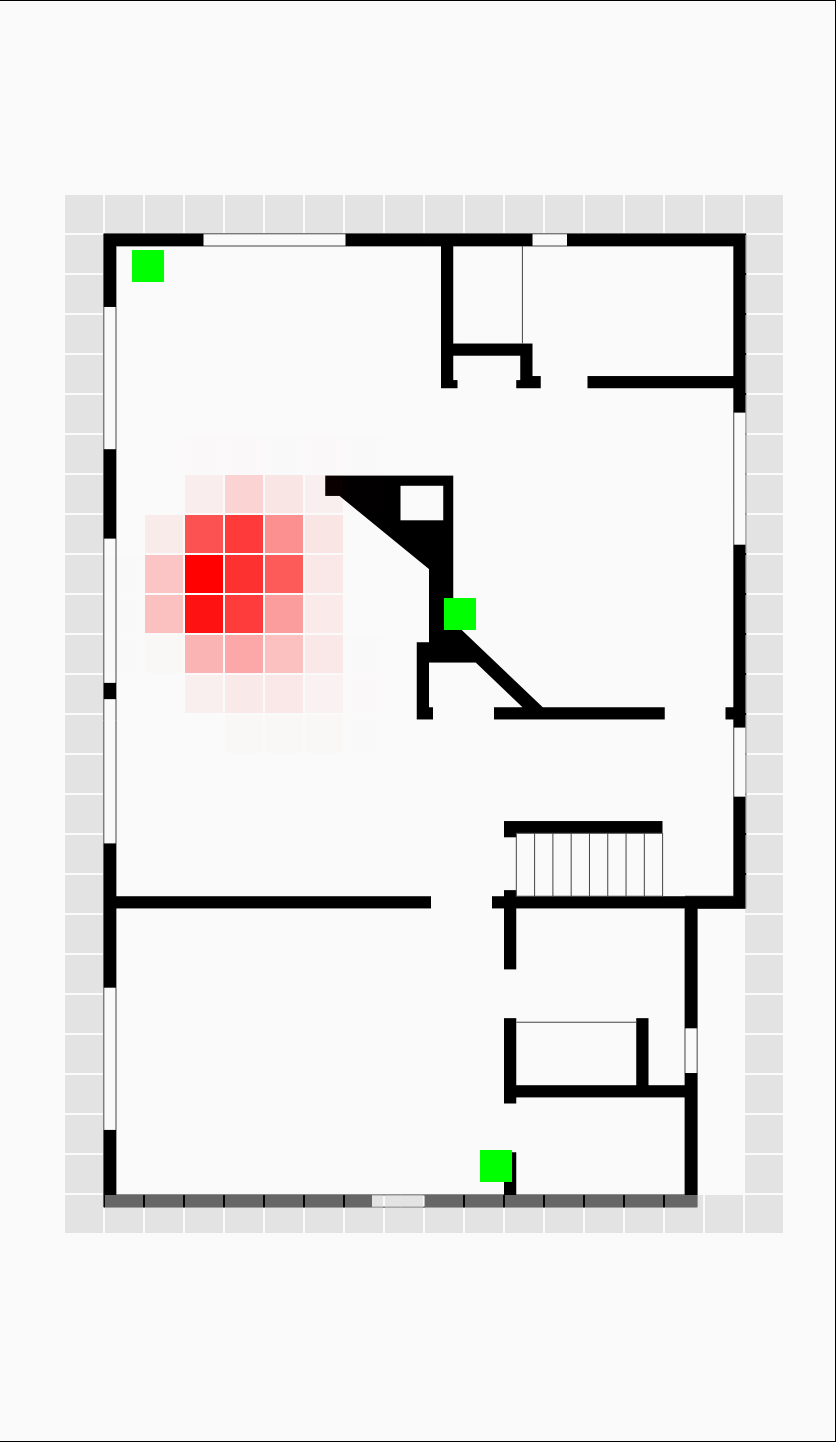
— by way of a red blob on a floorplan — where it thinks you are.
Note that only the locations of the Wi-Fi APs are needed
(no “learning”, “training” or
“fingerprinting”).
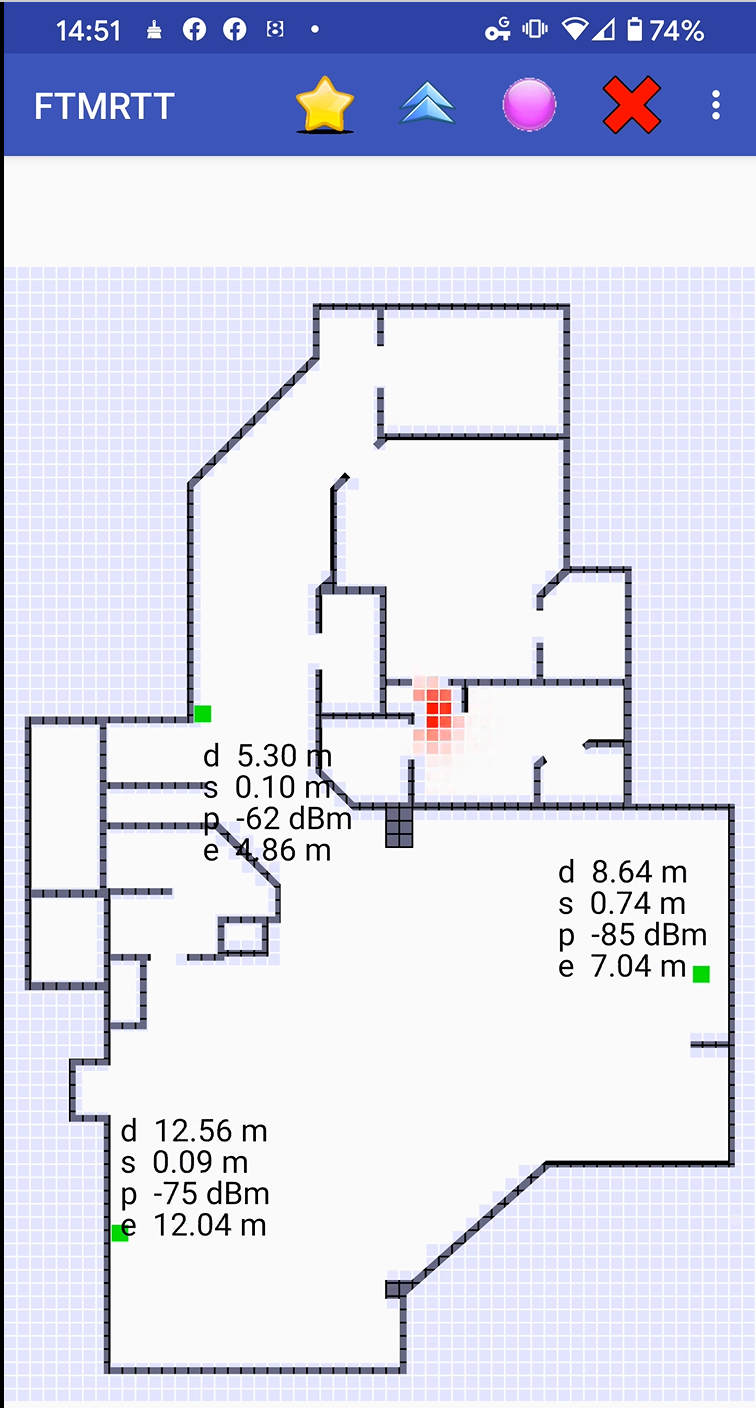
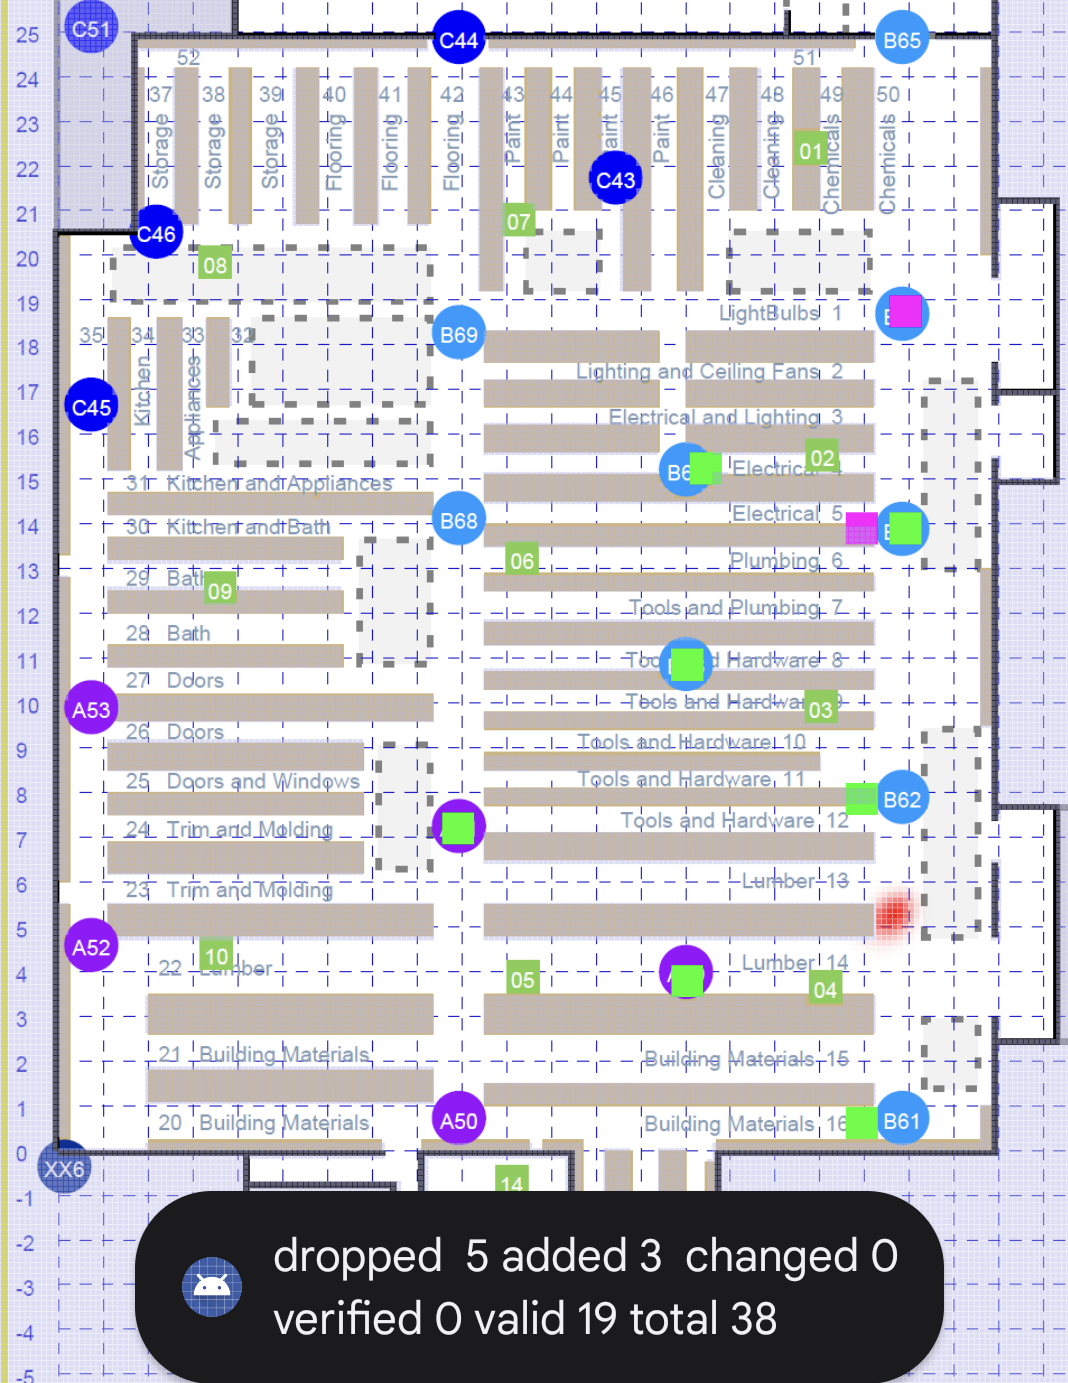
Above screenshots:
(a), (b), (c) Small house (8 m x 12 m, 6 APs on three levels);
(d) Large house (12 m x 20 m, 3 APs on one level);
(e) Big box store - illustrating ranging to uncooperative APs (82 m x 108 m, 20 APs);
(f) Large condo complex - illustrating outdoor use (100 m x 180 m, 44 APs).
The
FTMRTT
app can be used whether Wi-Fi APs supporting the FTM RTT protocol advertise their support
in the Wi-Fi beacon frames or not.
The FTMRTT app can even be used
with uncooperative APs (those not supporting the IEEE 802.11mc protocol)
using one-sided RTT measurements (with somewhat reduced accuracy).
FTMRTT reads three files (two of which are optional):
Responders
(e.g. “responders.json” — required ):
Locations of the Wi-Fi access points (APs).
This file uses a simple JSON format (example below).
The APs are identified by their “basic service set identifier”
— BSSID
(BSSIDs of APs can be determined using “Settings > Network & Internet”,
or some apps, such as
WifiRttScan or
WiFiRttScanX, see below).
The coordinates can be provided in any convenient Cartesian coordinate system (in meters).
Alternatively, geographical coordinates can be used (latitude and longitude in degrees).
The responders file can be used to provide additional information about
access points.
An elaborate example (for many more APs) may be found at
responders_1.json.
And a more recent example (using some new features) at
responders_2.json.
(Note: The sample files make use of some convenient extensions
supported by the Android JSON parser, such as C-style comments).
By the way, it is possible for APs to provide location information
themselves, although few do so as of now.
Presently, Compulab
Wi-Fi Indoor Location Device (WILD) can do this
using -lci=... and -civic=... lines in the hostapd.conf file.
In the case of Aruba APs running ArubaInstant, the location can be set up using: lci-location <latitude> <longitude> <altitude>
<uncertainty-radius> <altitude-uncertainty>
<number-of-floors>.
Further, Aruba's Open Locate initiative has made location
information available in their latest APs. See
Self-locating Wireless Access Points.
So, at some point, it won't be necessary to provide this information in the responders file.
Bounding box
(e.g. "boundingbox.json" — optional ):
Bounding box of a rectangular area of interest (in meters) to be shown on screen
(the corners should match those of the floor plan image provided — see below).
This file uses a simple JSON format (example below).
For convenience, the rectangle may be aligned with the sides of a building.
(If there is no bounding box file, a bounding box will be created
using the coordinates of the APs.)
The bounding box file can also be used to specify some other parameters.
A more detailed example may be found at
boundingbox_1.json.
A recent example (using some new features) may be found at
boundingbox_2.json.
(Note: The sample files make use of some convenient extensions, such as C-style comments, supported by the Android JSON parser).
The lower left corner of the bounding box need not be at [ 0, 0 ] and coordinates need not all be positive.
Floorplans
(e.g. "floorplans.png" — optional ):
Floorplan in image format.
This should be a bitmap image (PNG recommended) used as a background by the app.
It's lower left and upper right corners should correspond to
the those
specified in the bounding box.
(If there is no floorplan image file, a white background will be shown.)
Output (on screen)
The on-screen output shows a red “heat map” of the
probabilities of the user being in various positions
(see samples above).
The reddest spot is the most likely position,
while the centroid of the red blob —
shown as a yellow dot — is the expected value.
The locations of the access points are shown as well — color coded:
an AP currently responding to ranging requests is green,
an AP being interrogated but not responding to ranging
requests is magenta.
If selected from the menu, some additional information
(RTT distance, st dev, signal level, last few digits of the BSSID)
can be shown next to the graphic indicating an AP
(see first two sample screenshots above).
Optionally, for each AP, the annulus of currently most likely
positions for the user equipment (UE) can be overlaid (see discussion of menu items below):
File locations (input)
The files can be specified interactively using a “file picker”.
The file picker provides access to, amongst other places, the
“Downloads” folder on the phone, and your Google Drive (requires internet connection).
In the file picker, to indicate that an optional file (such as bounding box or floor plan) does
not exist, use the back arrow (or equivalent gesture).
When uncertain about which file is currently being picked,
click the “triple line” icon (≡).
The title in the next window will then indicate
floorplans, boundingbox, or responders.
The files can be anywhere,
and have any name (just remember the sequence in which they are
requested: floorplans, boundingbox, and then, responders).
Files (output)
The FTMRTT app folder on the phone has subfolders.
One subfolder, called “logfile”, contains log files (plain text format)
that optionally can be written by the app continuously recording its state
(basically a record of what is normally sent to “logcat”).
Log file recording can be toggled on and off using the
blue double up arrow in the action bar.
Another subfolder called “crash” is where, should the app crash, a dump is written in plain text format.
Both “logfile” and “crash” files can be useful for tracking down bugs.
These files can be accesses from a PC via USB link or via Android Debug Bridge (ADB)
For example: adb pull /storage/emulated/0/Android/data/com.welwitschia.ftmrtt/files/logfile
The Bayesian grid update method can exploit some prior information provided about the area of interest.
The floor plan may show walls (which are considered impenetrable by the Bayesian update rule).
Walls should be black in the floor plan image (or an optional color specified in the bounding
box file).
One-sided RTT
The best results are obtained when the access points and the phone support
the IEEE 802.11-2016 protocol (i.e. two-sided FTM RTT).
Google Wi-Fi APs and various Google Pixel phones do.
See AP FTM RTT support
for a list of APs that support two-sided FTM-RTT.
See
phone FTM RTT support for a list of phones,
and
retail, warehousing and distribution center devices
that support two-sided FTM-RTT.
By the way, quite a few APs support the protocol,
but do not advertise this in their Wi-Fi beacon frames.
In addition it is possible to work with uncooperative APs in
one-sided RTT mode.
In this case the menu selection “Two-Sided” should be
unchecked and the responder definition should include a
"offset-one-sided" field which specifies the amount
(always negative) to add to the returned one-sided RTT value.
For example: "offset-one-sided" : -2573,
These
offsets depend on the type of AP and can be determined
using the
WifiRttScanX
app (see below).
IEEE 802.11az
FTMRTT supports the older IEEE 802.11mc protocol for ranging as well
as the newer IEEE 802.11az (NGP) protocol. If your phone supports the newer
protocol, the menu will be modified to show "802.11az" below
"802.11mc" (instead of simply "Two-Sided RTT").
The new protocol is fastest when used with a burst size of 1.
WifiRttScanX
is an Android app that makes it easy to survey an area and determine BSSIDs,
frequency, bandwidth, signal strength etc.
It also provides a convenient way to
“calibrate”
a new type of AP, (i.e. determining its offset / bias).
This is particularly useful for one-sided RTT.
Controlling FTMRTT
A few features of FTMRTT are controlled from the action bar (see
below);
Additional features are controlled from the “more
menu” (indicated by a vertical ellipsis ⋮);
Less frequently used parameters can be changed using optional
entries in the bounding box or responder file.
FTMRTT Action Bar
Show version information;
Toggle logging to file;
Experimental
Exit from app (hard exit);
⋮
“More menu”
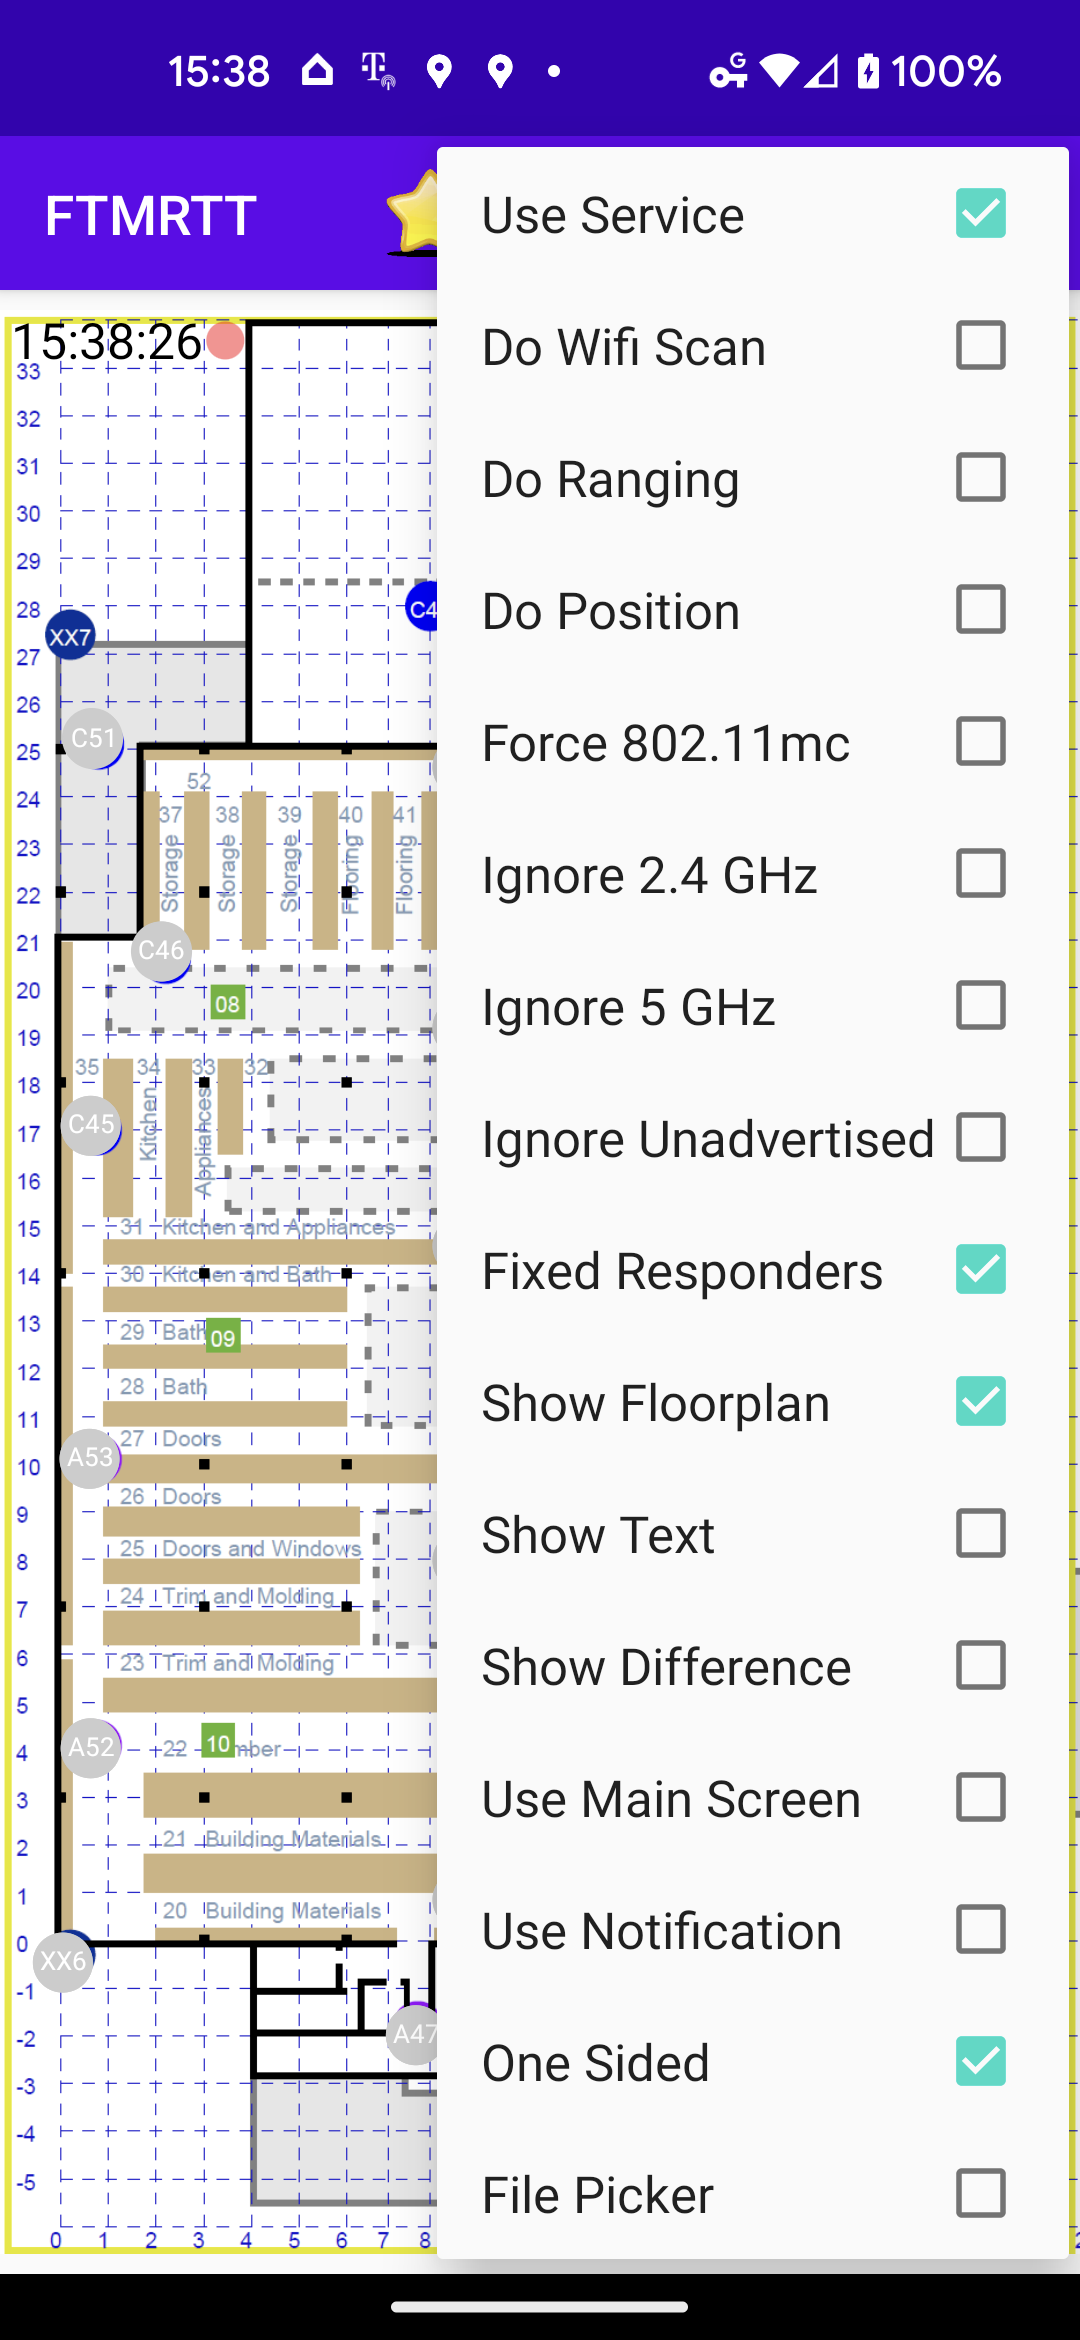
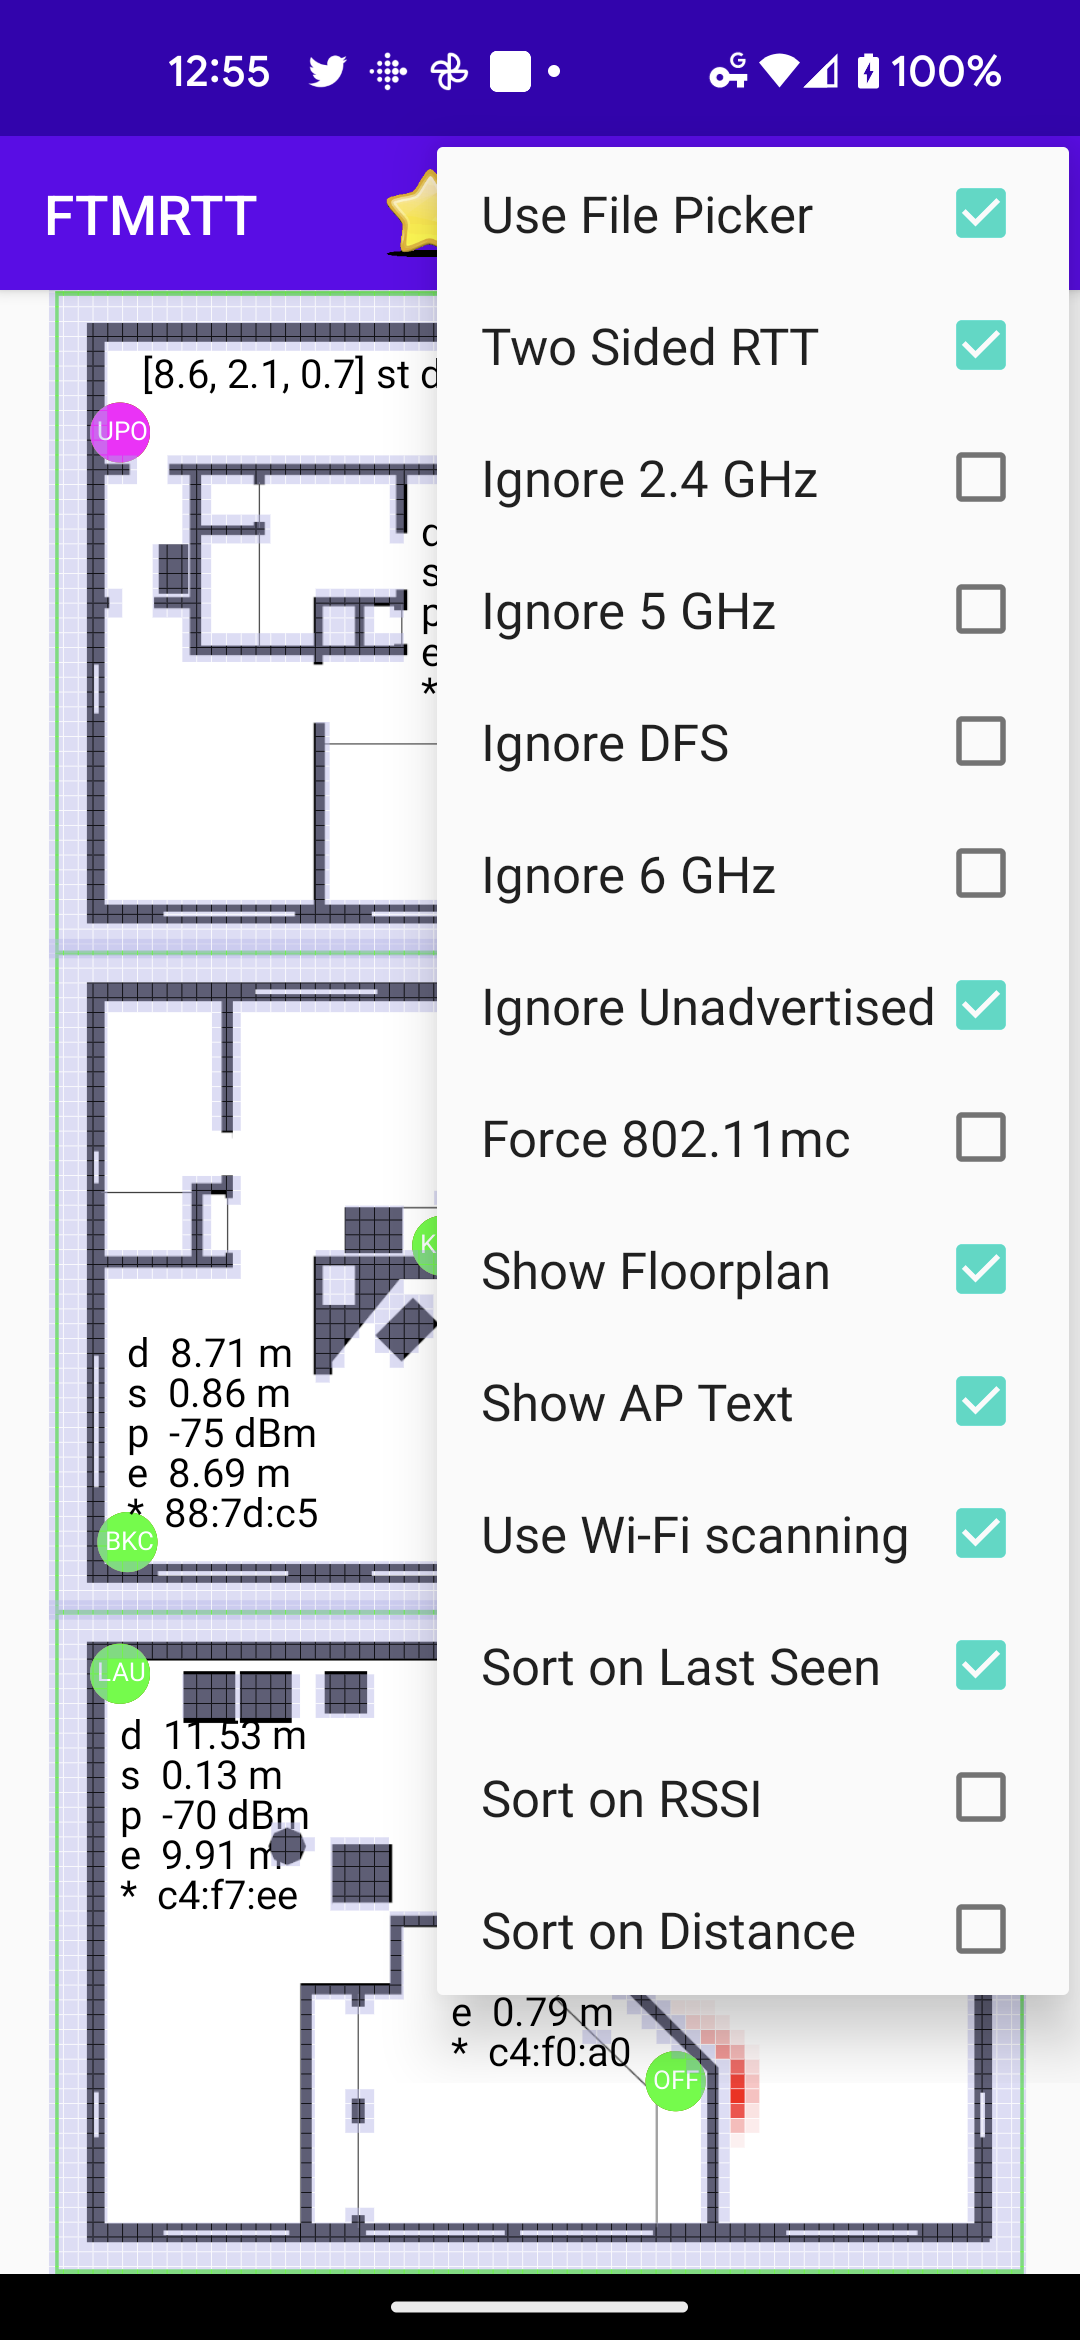
FTMRTT “More Menu” (⋮)
Note: The above screen shots are from different versions of
FTMRTT and so may be different from what the current version shows (right most).
Two Sided RTT - use 802.11mc protocol; or, if the phone supports 802.11az:
802.11mc - use 802.11mc protocol
802.11az - use 802.11az protocol
Ignore 2.4 GHz - ignore APs in 2.4 GHz band;
Ignore 5 GHz - ignore APs in 5 GHz band;
Ignore DFS - ignore APs in
DFS part of 5 GHz band;
Ignore 6 GHz - ignore APs in 6 GHz band;
Ignore Unadvertised - ignore APs not advertising support for IEEE 802.11mc;
Show AP Info - show current information next to AP;
Show GPS - show GPS information (if enabled);
Show Annuli - show rate vector information (see sample above);
Compensate RR - experimental - try to compensate for refractive retardation due to user's body;
Use Wi-Fi scanning - use Wi-Fi scanning to determine unknown properties of APs (s.a. frequency);
Use Range Probes - use range probes to determine unknown properties of APs;
Sort on Last Seen - prefer ranging to recently seen APs;
Sort on RSSI - prefer ranging to APs with strong signal;
Sort on Distance - prefer ranging to nearby APs;
Sort on Quality - prefer ranging to “high quality” APs (recommened);
Wi-Fi Scan Throttling:
Android 9 (API Level 28) introduced a limitation
on how often Wi-Fi scans can occur
(no more than 4 scans in 2 minutes when in foreground mode.)
This does not affect FTM RTT ranging, but FTMRTT may
perform Wi-Fi scans to determine which APs are nearby —
and what frequency and bandwidth they are operating on.
Fortunatey, since Android 10, overriding this has
become easy:
just disable “Wi-Fi scan throttling” from the
“Developer Options” menu
(assuming you have
enabled Developer Options).
When you first open the installed app you will get a
“Permission Activity Screen”
since Wi-Fi RTT Ranging requires “Fine Location” permission.
(You may also need to turn on “Location” in “Settings”)
If you already have one version of the app installed, then it may
happen that a new version cannot be installed on top of it
(perhaps because of a change in name or file “signature”).
In that case, simply uninstall the old version first.
Alternatively (“Side Loading”):
The latest beta version of the APK is also available on this web site.
Download the APK file FTMRTT.apk
from a browser on your phone.
Then open it.
You will most likely get a security alert and will be taken to
Settings to “allow installation from this source” (i.e. from your browser).
Details: if you are downloading in some browser, like FireFox or
Chrome, you have to give it permission to install. From Settings > Apps > Special app access > Install unknown apps.
Then click on the browser you use, and, finally, slide the
Allow from this source slider.
Alternatively, if you have AndroidStudio (or just its command-line tools) you can
use the Android Debug Bridge (ADB) with your phone connected via
USB cable: adb install FTMRTT.apk
You may need to use the -t and -r command line flags: adb install -t -r FTMRTT.apk
(or even adb install -r -t -d -g FTMRTT.apk).