Emulate a SPARCstation 2 running NetBSD

August 26 2007

Warning: This is alpha-quality software. Don't count on it for anything. Use it at your own risk.


Contents


Introduction

The Machine Emulator, or tme, is a program that provides a general-purpose framework for computer emulation. tme can emulate a SPARCstation 2.


Getting the tme software

  1. Find a reasonably fast machine to be the host. A 500MHz Pentium III seems to give performance close to a SPARCstation 2.

  2. Follow all of the instructions for getting, building, and installing tme found under http://csail.mit.edu/~fredette/tme/. If you want the emulated SPARCstation 2 to have network access, be sure to follow the instructions about enabling tme to access the network.

  3. Download the SPARCstation 2 Revision 2.9 ROM, the SBus cgthree 501-1415 ROM, and the SBus bwtwo 501-1561 ROM:

    http://csail.mit.edu/~fredette/tme/sun4-75-rev-2.9.bin
    http://csail.mit.edu/~fredette/tme/SUNW,501-1415.bin
    http://csail.mit.edu/~fredette/tme/SUNW,501-1561.bin

    If Sun asks me to stop distributing these ROMs, I will.


Making the machine-specific data

It's best to create a new working directory for each emulated machine you create. This directory will contain the configuration files and disk image for that machine.

In general, any working directory filename that begins with my- or MY- is a file that is specific to your individual emulated machine. With the exception of the disk image, these are mostly text files, and you are encouraged to edit many of them to suit yourself.

% mkdir /some/where/my-sun4c
% cd /some/where/my-sun4c

Now populate this directory:

  1. Copy the SUN4-75 machine description file into the working directory:
    % cp /usr/pkg/share/examples/tme/SUN4-75 ./MY-SUN4C
    
    This file contains tmesh commands that create a SPARCstation 2. If you don't change this file, it creates a SPARCstation 2 with a cgthree framebuffer, type-4 keyboard and mouse, one disk drive, one tape drive, and an unconnected network interface.

    If you can't use the emulated framebuffer (because, for example, you aren't running X or didn't build tme with GTK), you must edit this file to disable the GTK-based display and enable the serial console instead. Comments in the MY-SUN4C file should explain how to do this.

  2. Copy the ROM image into the working directory:
    % cp /some/where/sun4-75-rev-2.9.bin .
    

  3. Make a Sun 4c NVRAM/IDPROM file in the working directory:

    The Sun 4c NVRAM contents are kept in a file, with the Sun IDPROM information at the end. Creating an initial NVRAM file involves writing a file with a specific number of zeroes, followed by the IDPROM information.

    The tme-sun-idprom Perl script makes the IDPROM information. Before you can run it, you must choose an Ethernet address for your emulator - even if tme won't have access to the network. Ethernet addresses for Sun workstations always begin with 8:0:20, so pick three hexadecimal bytes XX:YY:ZZ such that 8:0:20:XX:YY:ZZ is not taken by any other machine on your LAN.

    % dd if=/dev/zero bs=1 count=2008 of=my-sun4c-nvram.bin
    % tme-sun-idprom SS2 8:0:20:XX:YY:ZZ >> my-sun4c-nvram.bin
    

  4. If you do want to use the GTK-based display, copy the Sun keyboards map, and keyboard macros file into the working directory:
    % cp /usr/pkg/share/examples/tme/sun-keyboards.txt .
    % cp /usr/pkg/share/examples/tme/my-sun-macros.txt ./my-sun-macros.txt
    
    You should not edit the sun-keyboards.txt file, however you may want to edit the my-sun-macros.txt file. The two files work together to transform key events on your keyboard into Sun type-4 scan codes.

    The sun-keyboards.txt file lists all of the symbols (in X terminology, all of the "keysyms") on a Sun type-4 keyboard, and gives for each keysym a Sun type-4 scan code and some modifier information. Because Sun type-4 keyboards are never going to change, you shouldn't change this file, even if you think it lists keysyms that your keyboard doesn't have, like L1, R11, etc.

    The my-sun-macros.txt file is meant to adapt your keyboard to the Sun type-4 keyboard. Any keysyms that the Sun type-4 keyboard has, that your keyboard doesn't have, can be generated by macros added to this file. For example, tmesh may complain that:

    [/display0.0]: cannot generate keysym 'R9' directly, or through a macro: No such file or directory
    
    The odds are good that you don't care about generating the R9 key - it's one of the keysyms on the strange, original Sun numeric keypad. But if you absolutely must be able to generate the R9 key, you could add a line similar to the following to your my-sun-macros.txt file:
    Alt_R F9 = R9
    
    Then, you could simulate pressing R9 by pressing the right Alt key and then the F9 key.

    The my-sun-macros.txt that you copied from sun-macros.txt contains a small number of macros for generating the L1, L2, etc., keys. These macros should be sufficient for general use - simply ignore the tmesh warnings about other, obscure keysyms.

    Under X, to learn about the keysyms present on your keyboard, the xmodmap -pk command will print out your current keyboard map. Alternately, the xev command may be a more convenient way to see what key combinations on your keyboard generate which keysyms.

  5. Create the empty disk image file. Decide how big you want the emulated disk to be, in bytes, and substitute that number for NNNNNNNN below:
    % dd if=/dev/zero of=my-sun4c-disk.img bs=1 count=1 seek=NNNNNNNN
    
    It's not immediately wasteful to choose a very large disk size - this dd command will create a disk image that initially takes up almost zero real space on your host's disk. Only as the disk is populated will your host's operating system allocate more real space to the image.


Installing NetBSD 3.1

Installing NetBSD in the emulator is very similar to installing it on a real SPARCstation 2. This is good, because it allows developers to experience and debug installation problems in the emulator.

Getting the NetBSD install CD-ROM image

NetBSD installation on tme uses a CD-ROM image. While an image of any vendor's NetBSD/sparc CD-ROM should work, only the NetBSD 3.1 official sparc CD-ROM image was tested.

The CD-ROM image must be downloaded and stored on your host machine, in your /some/where/my-sun4c/ directory.

Download the official NetBSD/sparc CD-ROM image from a mirror close to you. The pathname to the image is /pub/NetBSD/iso/3.1/sparccd-3.1.iso or something similar. You may also be able to download this image as a BitTorrent.

Booting and using the NetBSD install CD-ROM

Once you have an installation CD-ROM image, you must boot it.

  1. Start the emulator. Remember, if you're running a statically-linked, uninstalled emulator, you must have the environment variable LTDL_LIBRARY_PATH set to the top of your build tree:

    % cd /some/where/my-sun4c
    % tmesh ./MY-SUN4C
    ignore any cannot generate keysym warnings
    tmesh>

    The emulator itself is called tmesh. tmesh is a shell for running commands that create and control emulated machines. One day, you will be able to create and manage a whole set of emulated machines running inside the same tmesh process, but for now it's only been tested to handle one machine.

    tmesh takes one argument on its command line: the name of a text file containing initial commands for it to execute. In this case, MY-SUN4C contains commands to assemble a SPARCstation 2.

    A new blank GTK window should appear on your screen. If you see any error messages, hopefully they're descriptive enough to help you figure out what went wrong. Usually, the first error listed is the real problem; when a central element of the emulated SPARCstation 2 can't be created, many subsequent errors will be generated because all of the attachments to that central element also fail.

    If you don't see any error messages, at this tmesh> prompt, give the ls command. This should give the following output:

    tmesh> ls
    board0: tme/machine/sun4 name Calvin
    cpu0 at board0: tme/ic/cy7c601 fpu-type tms390-c602A fpu-compliance partial fpu-incomplete trap
    sbus0 controller at board0 sbus: tme/generic/bus size 4GB slot-addr 0xf8000000 slot-size 32MB slot 0 slot 1 slot 2 slot 3
    sbus0 controller at board0 sbus: tme/generic/bus size 4GB slot-addr 0xf8000000 slot-size 32MB slot 0 slot 1 slot 2 slot 3
    ram0 at sbus0 addr 0x0: tme/host/posix/memory ram 16MB
    rom0 at sbus0 addr 0xf6000000: tme/host/posix/memory rom sun4-75-rev-2.9.bin
    zs0 at sbus0 addr 0xf1000000 ipl 12: tme/machine/sun4/zs
    zs1 at sbus0 addr 0xf0000000 ipl 12: tme/machine/sun4/zs
    nvram0 at sbus0 addr 0xf2000000: tme/host/posix/memory persistent my-sun4c-nvram.bin
    clock0 at sbus0 addr 0xf20007f8: tme/machine/sun4/clock type tme/ic/mk48t02
    fdc0 at sbus0 addr 0xf7200000 ipl 11: tme/machine/sun4/fdc type tme/ic/i82072
    audioamd0 at sbus0 addr 0xf7201000 ipl 13: tme/ic/am7930
    kbd0 at zs1 channel A: tme/serial/keyboard type sun-type-4-us macros my-sun-macros.txt map sun-keyboards.txt rate 20
    ms0 at zs1 channel B: tme/serial/mouse type mousesystems-5
    sink1 at zs0 channel A: tme/serial/sink
    esp0 at sbus0 slot 0 offset 0x800000 ipl 3: tme/ic/lsi64854 revision 1+ channel scsi
    esp0 dma at sbus0 slot 0 offset 0x400000
    ncr0 at esp0 master: tme/ic/ncr53c9x variant esp100
    scsibus0 at ncr0: tme/scsi/bus
    le0 at sbus0 slot 0 offset 0xc00000 ipl 5 dma-offset 0xff000000: tme/ic/am7990
    cgthree0 at sbus0 slot 1 offset 0x0 ipl 7: tme/bus/sbus/cgthree
    cgthreerom0 at sbus0 slot 1 offset 0x0: tme/host/posix/memory rom SUNW,501-1415.bin
    display0 at cgthree0: tme/host/gtk/display
    display0 at kbd0
    display0 at ms0
    sd0 at scsibus0: tme/scsi/disk id 3 type tme-scsi-1
    disk0 at sd0: tme/host/posix/disk file my-sun4c-disk.img
    st0 at scsibus0: tme/scsi/tape id 4 type tme-scsi-1
    tape0 at st0: tme/host/posix/tape
    

    If the output contains all of these entries, your emulated SPARCstation 2 is ready to run.

  2. The next step is to load the install CD-ROM image into the CD-ROM drive:
    WARNING: Unfortunately, the current release of tme doesn't have true CD-ROM emulation. Temporarily, the modules that emulate regular disks are being reused to create a minimal CD-ROM emulation.

    What this means is that the CD-ROM emulation isn't very useful except for installation. For this reason, the CD-ROM emulation isn't enabled by default in the configuration file, and you have to give these long commands here to enable it:

    tmesh> cd0 at scsibus0: tme/scsi/cdrom id 6 type tme-scsi-1
    tmesh> cdrom0 at cd0: tme/host/posix/disk file sparccd-3.1.iso read-only
    
  3. Now you should be able to power up the emulated SPARCstation 2:
    tmesh> command board0 power up
    
    After a while (the SPARCstation 2 PROM does a good power-on self-test), you should see something like this:

    Initial PROM banner

    Because you started out with an NVRAM full of zeroes, the PROM has set the diag-switch? parameter to true and assumes that it should test all of its memory.

    Having the PROM test your host machine's memory is slow and not really useful, so it's best to disable the memory test in the NVRAM.

    First, break into the PROM monitor prompt by moving your mouse into the tmesh window and pressing RightControl-F1-A, using the right Control key (assuming you're using the standard tme Sun keyboard macros). This will emulate pressing L1-A, which will break into the PROM's "old command mode":

    Type b (boot), c (continue), or n (new command mode)
    >
    
    You want "new command mode", which is the real OpenBoot PROM:
    > n
    Type  help  for more information
    ok
    
    Now you can turn the diagnostics switch and the memory test off:
    ok setenv diag-switch? false
    diag-switch? =        false
    ok setenv selftest-#megs 0
    selftest-#megs =      0
    ok
    
    Now, tell the PROM to boot the install CD-ROM:
    ok boot cdrom
    
    After a short delay, the PROM should begin booting the install CD-ROM image:

    Loading the INSTALL kernel

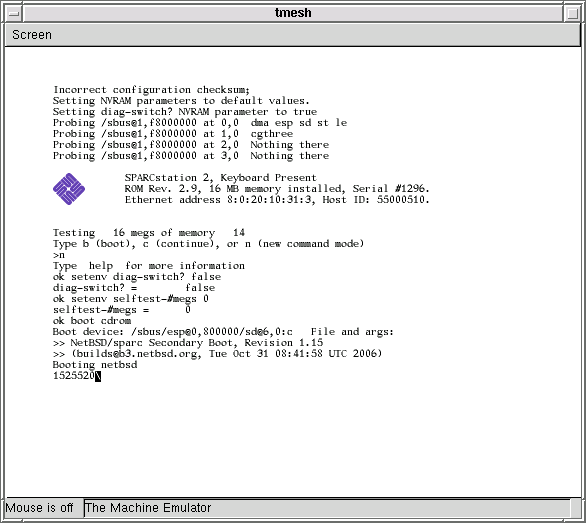
    Once the INSTALL kernel has been booted, the installation microroot will display the first installation prompt:

    The installation medium prompt

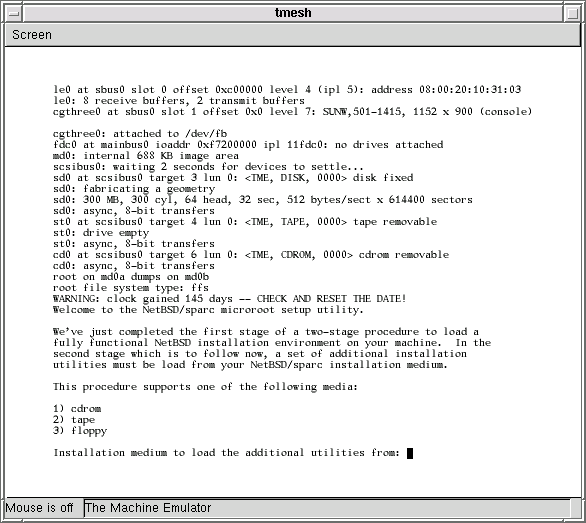
    You want to enter 1 to load the installation utilities from CD-ROM. Hit Enter twice to use the default /dev/cd0a device and /cdrom/sparc/installation/bootfs/instfs.tgz.

    After a while (it takes some time to decompress instfs.tgz), you will be prompted for a terminal type (hit Enter), and finally select I to start sysinst.

Running sysinst

Now you should follow the traditional
NetBSD/sparc installation procedure.

Some notes and hints:

  • When you're done with sysinst, from its main menu select Exit Install System. This will return you to the PROM ok prompt, and boot should boot the new installation.

  • Now that the system has been fully installed, you may want to add a line to MY-SUN4C to automatically power up the machine each time you start tmesh:

    % echo 'command board0 power up' >> MY-SUN4C


    Notes, bugs, etc.


    Copyright © 2007 Matt Fredette, All Rights Reserved
    $Revision: 1.1 $