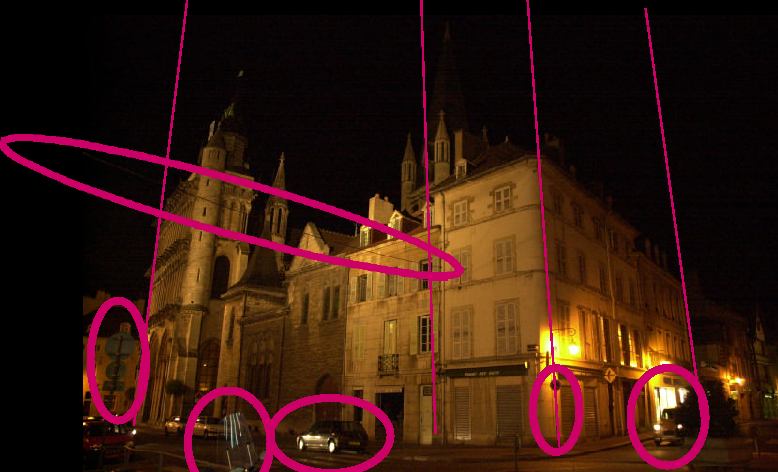
As illustrated in the problem image.
You will first need to increase the size of your canvas (image->canvas size) to make sure that you have a big-enough working area.
Then select the input photo using the rectangular marquee tool and use edit->transformation->distort
You have 4 handles on the four corners of your selection, and by moving them you distort (or un-distort) the picture. Double-click inside the selection when you are happy with your un-distortion.
You can then select the rectangular frame that you are interested in and crop (image->crop) the image.
Save often
Use the history window to perform multiple undo.
Copy the initial image (after un-distortion) on a separate layer, it is a good back-up plan.
Do not hesitate to use additional layers when working on a specific area. This way you are sure that you can delete the layer if you do not like what you have done, and you can also use the layer-masks to blend between edited and un-edited versions.


You can start practicing by replicating or deleting windows (although this is not required, it is a good exercise to see how rubber-stamping works)
Choose the rubberstamp tool ![]()
First you have to choose the source region by alt-clicking (e.g.
on one corner), and then you simply paint and the tool copies
from the source region.
The first key to success is to choose the right size of brush
and using a soft brush to have seamless stamping.

The second key is in the first and second click, that determine the alignement of the source and destination region. In particular, when rubberstamping patterns with strong lines, make sure that they align. For example, in the picture below, when "deleting" the car, I rubberstamped the texture from above. I first right click on one vertical edge to set the source region (white arrow). I then start rubberstamping, and my first click is on the same edge (white circle).

Also, you will find it easier to use rubberstamping after perspective has been corrected because things align more nicely.
Then deleting parts of the scene just consists in painting (with the rubberstamp) what you thing would be behind the undesired object. You will usually find neighbouring parts of the image with the same texture and intensity.
For example, to remove the wire, you can rubberstamp from the area slightly above or below...

From time to time, you have to re-set the source region, because you run out of the nicely textured region. You then re-do the alt click and start rubberstamping
Use the area above and below as source for rubberstamping. Beware of the strong edges (building silhouettes), make sure that you re-initialize the source region and align it well.
The top of the central sign is the hardest part, because of the nearby lamp that creates very strong intensity gradients, making it hard to rubber-stamp. Using a small brush size is necessary.
Use the window on the left as texture. It has the same perspective (foreshortening)

As can be found in my Photoshop version:
The rubber stamp tool takes a sample of the image, which you
can then apply over another image or part of the same image. Each
stroke of the tool paints on more of the sampled image. Cross
hairs mark the original sampling point. The pattern stamp tool
lets you select part of an image and paint with the selection
as a pattern.
For information on restoring painted areas to their previous states,
see Painting with a state or snapshot of the image.
To use the rubber stamp tool and pattern stamp tool:
1 Double-click the rubber stamp tool () or pattern stamp tool
() to display its Options palette.
2 Do any of the following:
• Specify the blending mode and opacity as explained
in Using the Options palette for painting and editing tools.
• Choose a brush size as explained in Using the Brushes
palette
• If you are using a pressure-sensitive drawing tablet,
select Size to change the brush size with changes in stylus pressure,
Opacity to change the opacity.
3 If you are using the rubber stamp tool, select Use All Layers
to sample data from all visible layers. If left deselected, the
tool samples only from the active layer.
4 Do one of the following:
• With the rubber stamp tool, select Aligned to apply
the entire sampled area once, regardless of how many times you
stop and resume painting. This option is useful when you want
to use different sized brushes to paint an image. You can also
use the Aligned option to duplicate two halves of a single image
and place them at different locations.
• With the rubber stamp tool, deselect Aligned to apply
the sampled area from the initial sampling point each time you
stop and resume painting. Because the rubber stamp tool samples
the entire image, this option is useful for applying multiple
copies of the same part of an image to different images.
• With the pattern stamp tool, select Aligned to repeat
the pattern as contiguous, uniform tiles, even when you stop and
resume painting in different parts of the image.
• With the pattern stamp tool, deselect Aligned to center
the pattern on the pointer each time you stop and resume painting.
5 Set the sampling point or pattern:
• For the rubber stamp tool, position the pointer on the part of any open image you want to sample, and Alt-click (Windows) or Option-click (Mac OS). This sample point is the location from which the image is duplicated as you paint.
Sampling point, and with cross hairs marking the part of the original being applied
• For the pattern stamp tool, use the rectangle marquee tool () on any open image to select an area to use as a pattern. Then choose Edit > Define Pattern. Reselect the pattern stamp tool.
Area defined for pattern, and painted
Note: If you are sampling or using a pattern from one image and applying to another, both images must be in the same color mode.
6 Drag to paint with the tool.