This page is mainly for keeping track of things that I develop. Feel free to use whatever you find helpful!
I doubt that any of the things can cause any damage, but if it does, I will not be held liable for it.
Photo / Video Tools
The following files are a set of photo editing scripts I use in
GIMP (a free alternative to Photoshop).
- Median and Unsharp Mask - This applies the default despeckling followed by the default unsharp mask. I find this is a pretty useful combination in high ISO images.
- Vignette Effect - This applies a vignetting effect to your picture (darkening the outsides). You can first select a region to do the vignetting on (select the objects you do not want to darken) and then run the script. If nothing is selected, an ellipse will be automatically drawn on the entire image domain for the vignetting effect to be performed on. A typical Gaussian blurring radius should be about 1/4 - 1/2 the size of the smallest image dimension.
[ Windows Download ] [ Linux-Bash Download ]
I use the following bash script to convert my Nikon RAW NEF files. The Windows code isn't included because I'm too lazy to post it. If you want it, let me know. These are both basically wrappers for
exiftool,
jhead, and
jpegtran. These files have been included in the Windows *.zip, but should be installed separately for Linux.
[ Windows Download ]
I use the following application to batch convert movies. This is basically a wrapper for
HandBrake’s Command Line Interface, which must be downloaded separately. handbrakeScript.exe should be put into the HandBrake Program Files directory. The default settings are used for conversion. If HD conversion is selected, the x264 codec is used with the "Regular" preset.
[ Linux-Bash Download ]
I use the following bash script to convert my image files:
#!/bin/bash

# batch converts images from one type to another
shopt -s expand_aliases
alias cecho=/usr/bin/cecho.sh

echo ""
cecho "**************************************" r
echo "What kind of file would you like to convert from? (e.g. jpg, gif, png, bmp)"
read inExtension
echo ""
echo "What kind of file would you like to convert to? (e.g. jpg, gif, png, bmp)"
read outExtension

cecho "**************************************" r
for f in *.${inExtension}
do
echo $f
done
echo "Are you sure you want to convert all the files listed above? (y/n)"
read confirm

cecho "**************************************" r

if [ $confirm == "y" ]
then

echo "Starting conversion..."

for f in *.${inExtension}
do
echo "Processing $f file..."
outname=${f%.*}.${outExtension}
convert ${f} ${outname}
done
cecho "**************************************" r
echo ""
fi
Random Things
[ OpenMP_reduction_array.zip ]
OpenMP is a great tool to parallelize code on your CPU. Reduction variables allow one to calculate things
such as the sum, product, maximum, or minimum of an array in parallel. Unfortunately, OpenMP only supports
doing reduction of an array into a scalar value. If, for example, each element in the array belongs to a
cluster, and you want to find the resulting sum of the array for each cluster, you are sore out of luck
with OpenMP in C++. Apparently, you can do it in Fortran, but how many people do you know that use Fortran?
To get around this problem, you typically create a separate reduction array for each thread.
Then, in your OpenMP parallel for loop, you restrict each thread to update their own copy of the reduction
array. After the for loop, you combine all the different copies of the reduction arrays into one.
This can be a pain to code up. The reduction_array class provided here makes this process easier. Also, if
for some reason you have to define your own reduction function that OpenMP does not support, this class
has the functionality to do that.
The interface is pretty simple. Assume we have an array of length N and a reduction array of length D
and want to do an addition (multiplication, minimization, and maximization have built-in support, but
users can also specify their own function with a simple function pointer). In sequential code, this
would look like
// allocate the array for total reduction
double* output = new double[D];
memset(output,0,sizeof(double)*D);
for (int i=0; i<N; i++)
{
   // assume "x" should be put into the array at index "d"
   output[d] += x;
}
// do some other stuff here...
delete[] output;
The parallelized code using OpenMP and reduction_array looks like:
// allocate the reduction_array variable
reduction_array<double> my_arr(numThreads,D,0);
#pragma omp parallel num_threads(numThreads)
{
   #pragma omp for
   for (int i=0; i<N; i++)
   {
      // assume "x" should be put into the array at index "d"
      total_parallel.reduce_add(omp_get_thread_num(), d, x);
   }
}
// accumulate the reductions after the parfor loop
double* output = total_parallel.final_reduce_add();
// do some other stuff here...
In contrast, the parallelized code using OpenMP *without* reduction_array looks like:
// allocate dynamic arrays for each thread
double** my_arr = new double*[numThreads];
for (int t=0 t<numThreads; t++)
{
   my_arr[t] = new double[D];
   memset(my_arr,0,sizeof(double)*D);
}
#pragma omp parallel num_threads(numThreads)
{
   #pragma omp for
   for (int i=0; i<N; i++)
   {
      // assume "x" should be put into the array at index "d"
      my_arr[omp_get_thread_num()][d] += x;
   }
}

// allocate the array for total reduction
double* output = new double[D];

// accumulate the reductions after the parfor loop
for (int d=0; d<D; d++)
{
   output[d] = 0;
   for (int t=0; t<numThreads; t++)
      output[d] += my_arr[t][d];
}
// do some other stuff here...
delete[] output;
This is clearly much more cumbersome. Can you imagine what it would look like with multiple reduction arrays of different lengths?!
Anyway, see the included demo script for more information. Good luck, and happy parallelizing!
- Locate the file that tells us where to find the syntax highlighting files: $HOME/.kde/share/config/katesyntaxhighlightingrc
- Edit the syntax file (e.g. /usr/share/apps/katepart/syntax/cpp.xml). Don't forget to make a backup if you want!
[ helperMEX.h ] [ addMatrices.cpp ]
Matlab is really great at vector operations, but it's painfully slow if you have big nested for loops or if you really just can't avoid looping through vectors. These are situations when C++ can come to the rescue. I struggled with programming C++ for Matlab back in undergrad because of the lack of a good tutorials. I've included two files here that are no where near what a good tutorial would look like, but they should get you quickly started on programming MEX files. Download both, and open up addMatrices.cpp for a quick demo on how to add two matrices.
Mathworks has a more complete reference guide here: http://www.mathworks.com/support/tech-notes/1600/1605.html.
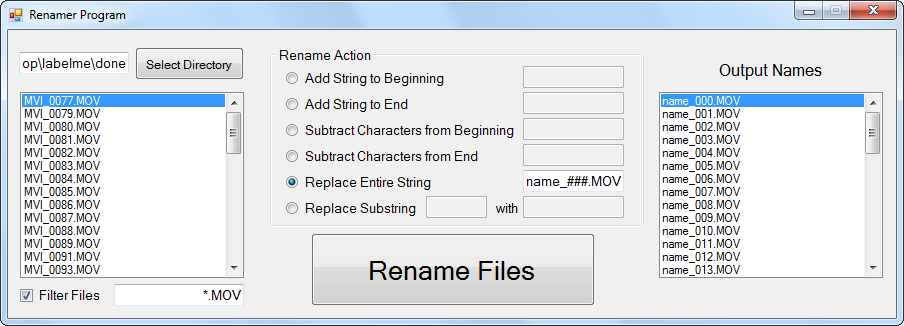
[ Windows Install ] [ Source Code ]
I wrote this application to rename a bunch of files at once (especially useful for pictures). It can add a constant string or subtract a number of characters from the beginning or end of all files, or replace a substring within all files. Additionally, one can use "####" to include a counter.
[ Linux-Bash Download ]
I use the following bash script to echo in colored text for Bash (in my /usr/bin/ directory). Some of this was taken from somewhere, but I don’t remember where anymore :
#!/bin/bash
# cecho.sh Echoing text messages in color.
blue='\e[01;34m'
green='\e[01;32m'
cyan='\e[01;36m'
red='\e[01;31m'
yellow='\e[01;33m'
white='\e[01;37m'
none='\e[00m'

if [ "$2" = "b" ]; then
color=$blue
fi
if [ "$2" = "g" ]; then
color=$green
fi
if [ "$2" = "c" ]; then
color=$cyan
fi
if [ "$2" = "r" ]; then
color=$red
fi
if [ "$2" = "y" ]; then
color=$yellow
fi
if [ "$2" = "w" ]; then
color=$white
fi
Method 1 - Office 2007
The best "fast" method I have for printing to conspirator is the following
- Make a poster in Powerpoint 2007
- Using Microsoft’s "Save as PDF" Add-in (found here), save the poster to a PDF
- Print to the correct size
Not only does the saved PDF have really small size (and more accurate graphics), it prints really fast! For a 42"x56" poster with tons of graphics, it takes only a few minutes for the job to spool and start printing.
Method 2 - Older Microsoft Offices
The previous "fast" method I had for printing to conspirator was the following
- Make a poster in Powerpoint
- Print to PDF using CutePDFWriter (I tried Adobe’s printer, but it has worse results
- Import the PDF into Photoshop, and safe as a new PDF
- Open the new PDF in Acrobat and print to the correct size
This method started printing (i.e. the spooling period) after about 3 minutes for a 42”x56” poster with tons of graphics. There were sometimes some unwanted JPEG artifacts on edges, but nothing too drastic.