 Intent
 Intent
Decouple an abstraction from its implementation so that the two can vary independently.
 Also Known As
Handle/Body
 Motivation
When an abstraction can have one of several possible implementations, the usual way to accommodate them is to use inheritance. An abstract class defines the interface to the abstraction, and concrete subclasses implement it in different ways. But this approach isn't always flexible enough. Inheritance binds an implementation to the abstraction permanently, which makes it difficult to modify, extend, and reuse abstractions and implementations independently.
Consider the implementation of a portable Window abstraction in a user interface toolkit. This abstraction should enable us to write applications that work on both the X Window System and IBM's Presentation Manager (PM), for example. Using inheritance, we could define an abstract class Window and subclasses XWindow and PMWindow that implement the Window interface for the different platforms. But this approach has two drawbacks:

Clients should be able to create a window without committing to a concrete implementation. Only the window implementation should depend on the platform on which the application runs. Therefore client code should instantiate windows without mentioning specific platforms.
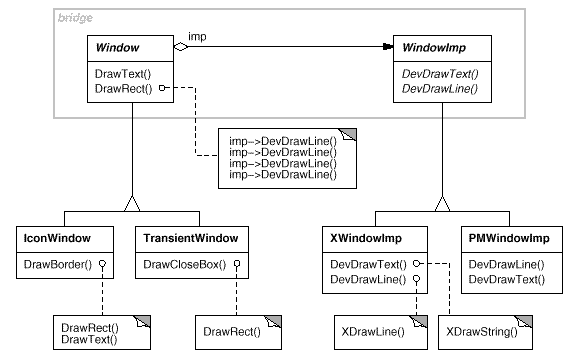
The Bridge pattern addresses these problems by putting the Window abstraction and its implementation in separate class hierarchies. There is one class hierarchy for window interfaces (Window, IconWindow, TransientWindow) and a separate hierarchy for platform-specific window implementations, with WindowImp as its root. The XWindowImp subclass, for example, provides an implementation based on the X Window System.

All operations on Window subclasses are implemented in terms of abstract operations from the WindowImp interface. This decouples the window abstractions from the various platform-specific implementations. We refer to the relationship between Window and WindowImp as a bridge, because it bridges the abstraction and its implementation, letting them vary independently.
 Applicability
Use the Bridge pattern when
 Structure
 Participants
 Collaborations
 Consequences
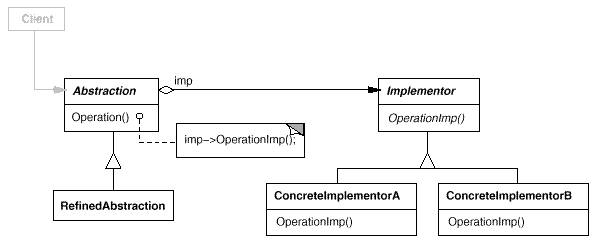
The Bridge pattern has the following consequences:
Decoupling Abstraction and Implementor also eliminates compile-time dependencies on the implementation. Changing an implementation class doesn't require recompiling the Abstraction class and its clients. This property is essential when you must ensure binary compatibility between different versions of a class library.
Furthermore, this decoupling encourages layering that can lead to a better-structured system. The high-level part of a system only has to know about Abstraction and Implementor.
 Implementation
Consider the following implementation issues when applying the Bridge pattern:
Carolan [Car89] uses the term "Cheshire Cat" to describe this separation. In C++, the class interface of the Implementor class can be defined in a private header file that isn't provided to clients. This lets you hide an implementation of a class completely from its clients.
If Abstraction knows about all ConcreteImplementor classes, then it can instantiate one of them in its constructor; it can decide between them based on parameters passed to its constructor. If, for example, a collection class supports multiple implementations, the decision can be based on the size of the collection. A linked list implementation can be used for small collections and a hash table for larger ones.
Another approach is to choose a default implementation initially and change it later according to usage. For example, if the collection grows bigger than a certain threshold, then it switches its implementation to one that's more appropriate for a large number of items.
It's also possible to delegate the decision to another object altogether. In the Window/WindowImp example, we can introduce a factory object (see Abstract Factory (87)) whose sole duty is to encapsulate platform-specifics. The factory knows what kind of WindowImp object to create for the platform in use; a Window simply asks it for a WindowImp, and it returns the right kind. A benefit of this approach is that Abstraction is not coupled directly to any of the Implementor classes.
    Handle& Handle::operator= (const Handle& other)  {
        other._body->Ref();
        _body->Unref();

        if (_body->RefCount() == 0) {
            delete _body;
        }
        _body = other._body;

        return *this;
    }
 Sample Code
The following C++ code implements the Window/WindowImp example from the
Motivation section. The Window class defines the window abstraction
for client applications:
    class Window {
    public:
        Window(View* contents);

        // requests handled by window
        virtual void DrawContents();

        virtual void Open();
        virtual void Close();
        virtual void Iconify();
        virtual void Deiconify();

        // requests forwarded to implementation
        virtual void SetOrigin(const Point& at);
        virtual void SetExtent(const Point& extent);
        virtual void Raise();
        virtual void Lower();

        virtual void DrawLine(const Point&, const Point&);
        virtual void DrawRect(const Point&, const Point&);
        virtual void DrawPolygon(const Point[], int n);
        virtual void DrawText(const char*, const Point&);

    protected:
        WindowImp* GetWindowImp();
        View* GetView();

    private:
        WindowImp* _imp;
        View* _contents; // the window's contents
    };
Window maintains a reference to a WindowImp, the
abstract class that declares an interface to the underlying windowing
system.
    class WindowImp {
    public:
        virtual void ImpTop() = 0;
        virtual void ImpBottom() = 0;
        virtual void ImpSetExtent(const Point&) = 0;
        virtual void ImpSetOrigin(const Point&) = 0;

        virtual void DeviceRect(Coord, Coord, Coord, Coord) = 0;
        virtual void DeviceText(const char*, Coord, Coord) = 0;
        virtual void DeviceBitmap(const char*, Coord, Coord) = 0;
        // lots more functions for drawing on windows...
    protected:
        WindowImp();
    };
Subclasses of Window define the different kinds of
windows the application might use, such as application windows,
icons, transient windows for dialogs, floating palettes of tools,
and so on.
For example, ApplicationWindow will implement
DrawContents to draw the View instance
it stores:
    class ApplicationWindow : public Window {
    public:
        // ...
        virtual void DrawContents();
    };

    void ApplicationWindow::DrawContents () {
        GetView()->DrawOn(this);
    }
IconWindow stores the name of a
bitmap for the icon it displays...
    class IconWindow : public Window {
    public:
        // ...
        virtual void DrawContents();
    private:
        const char* _bitmapName;
    };
...and it implements DrawContents to draw the bitmap
on the window:
    void IconWindow::DrawContents() {
        WindowImp* imp = GetWindowImp();
        if (imp != 0) {
            imp->DeviceBitmap(_bitmapName, 0.0, 0.0);
        }
    }
Many other variations of Window are possible. A
TransientWindow may need to communicate with the window that
created it during the dialog; hence it keeps a reference to that
window. A PaletteWindow always floats above other windows.
An IconDockWindow holds
IconWindows and arranges them neatly.
Window operations are defined in terms of the
WindowImp interface. For example,
DrawRect extracts four coordinates from its two Point
parameters before calling the
WindowImp operation that draws the rectangle in the window:
    void Window::DrawRect (const Point& p1, const Point& p2) {
        WindowImp* imp = GetWindowImp();
        imp->DeviceRect(p1.X(), p1.Y(), p2.X(), p2.Y());
    }
Concrete subclasses of WindowImp support different window
systems. The XWindowImp subclass supports the X Window
System:
    class XWindowImp : public WindowImp {
    public:
        XWindowImp();

        virtual void DeviceRect(Coord, Coord, Coord, Coord);
        // remainder of public interface...
    private:
        // lots of X window system-specific state, including:
        Display* _dpy;
        Drawable _winid;  // window id
        GC _gc;           // window graphic context
    };
For Presentation Manager (PM), we define a PMWindowImp
class:
    class PMWindowImp : public WindowImp {
    public:
        PMWindowImp();
        virtual void DeviceRect(Coord, Coord, Coord, Coord);

        // remainder of public interface...
    private:
        // lots of PM window system-specific state, including:
        HPS _hps;
    };
These subclasses implement WindowImp operations in terms of
window system primitives. For example,
DeviceRect is implemented for X as follows:
    void XWindowImp::DeviceRect (
        Coord x0, Coord y0, Coord x1, Coord y1
    ) {
        int x = round(min(x0, x1));
        int y = round(min(y0, y1));
        int w = round(abs(x0 - x1));
        int h = round(abs(y0 - y1));
        XDrawRectangle(_dpy, _winid, _gc, x, y, w, h);
    }
The PM implementation might look like this:
    void PMWindowImp::DeviceRect (
        Coord x0, Coord y0, Coord x1, Coord y1
    ) {
        Coord left = min(x0, x1);
        Coord right = max(x0, x1);
        Coord bottom = min(y0, y1);
        Coord top = max(y0, y1);

        PPOINTL point[4];

        point[0].x = left;    point[0].y = top;
        point[1].x = right;   point[1].y = top;
        point[2].x = right;   point[2].y = bottom;
        point[3].x = left;    point[3].y = bottom;

        if (
            (GpiBeginPath(_hps, 1L) == false) ||
            (GpiSetCurrentPosition(_hps, &point[3]) == false) ||
            (GpiPolyLine(_hps, 4L, point) == GPI_ERROR)  ||
            (GpiEndPath(_hps) == false)
        ) {
            // report error

        } else {
            GpiStrokePath(_hps, 1L, 0L);
        }
    }
How does a window obtain an instance of the right
WindowImp subclass? We'll assume
Window has that responsibility in this example.
Its GetWindowImp operation gets the right instance from an
abstract factory (see Abstract Factory (87))
that effectively encapsulates all window system specifics.
    WindowImp* Window::GetWindowImp () {
        if (_imp == 0) {
            _imp = WindowSystemFactory::Instance()->MakeWindowImp();
        }
        return _imp;
    }
WindowSystemFactory::Instance() returns an abstract factory
that manufactures all window system-specific objects. For simplicity,
we've made it a Singleton (127) and have let the
Window class access the factory directly.
 Known Uses
The Window example above comes from ET++ [WGM88]. In ET++, WindowImp is called "WindowPort" and has subclasses such as XWindowPort and SunWindowPort. The Window object creates its corresponding Implementor object by requesting it from an abstract factory called "WindowSystem." WindowSystem provides an interface for creating platform-specific objects such as fonts, cursors, bitmaps, and so forth.
The ET++ Window/WindowPort design extends the Bridge pattern in that the WindowPort also keeps a reference back to the Window. The WindowPort implementor class uses this reference to notify Window about WindowPort-specific events: the arrival of input events, window resizes, etc.
Both Coplien [Cop92] and Stroustrup [Str91] mention Handle classes and give some examples. Their examples emphasize memory management issues like sharing string representations and support for variable-sized objects. Our focus is more on supporting independent extension of both an abstraction and its implementation.
libg++ [Lea88] defines classes that implement common data structures, such as Set, LinkedSet, HashSet, LinkedList, and HashTable. Set is an abstract class that defines a set abstraction, while LinkedList and HashTable are concrete implementors for a linked list and a hash table, respectively. LinkedSet and HashSet are Set implementors that bridge between Set and their concrete counterparts LinkedList and HashTable. This is an example of a degenerate bridge, because there's no abstract Implementor class.
NeXT's AppKit [Add94] uses the Bridge pattern in the implementation and display of graphical images. An image can be represented in several different ways. The optimal display of an image depends on the properties of a display device, specifically its color capabilities and its resolution. Without help from AppKit, developers would have to determine which implementation to use under various circumstances in every application.
To relieve developers of this responsibility, AppKit provides an NXImage/NXImageRep bridge. NXImage defines the interface for handling images. The implementation of images is defined in a separate NXImageRep class hierarchy having subclasses such as NXEPSImageRep, NXCachedImageRep, and NXBitMapImageRep. NXImage maintains a reference to one or more NXImageRep objects. If there is more than one image implementation, then NXImage selects the most appropriate one for the current display device. NXImage is even capable of converting one implementation to another if necessary. The interesting aspect of this Bridge variant is that NXImage can store more than one NXImageRep implementation at a time.
 Related Patterns
An Abstract Factory (87) can create and configure a particular Bridge.
The Adapter (139) pattern is geared toward making unrelated classes work together. It is usually applied to systems after they're designed. Bridge, on the other hand, is used up-front in a design to let abstractions and implementations vary independently.