Perceptual Gamut Mapping Options in Eye-One Matchby Eric ChanLast updated: July 5, 2007 (Updated July 5 to include Mac OS X-specific info, thanks to Stephen B.)
By default, Eye-One Match builds the perceptual tables in RGB printer profiles using a gamut mapping method called LOGO Colorful. This method works well on some images, but not so well on others. Fortunately, Eye-One Match also supports two other perceptual gamut mapping methods: LOGO Chroma Plus and LOGO Classic. What are the differences between these three gamut mapping options? The following explanation comes from ProfileMaker's documentation:
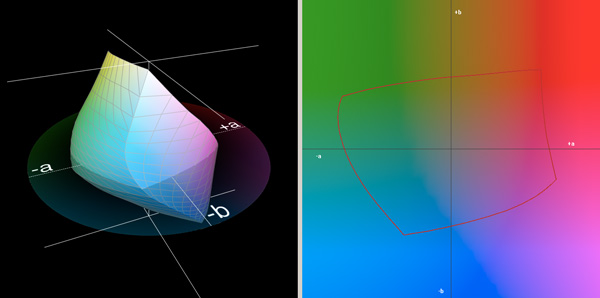
Bunch of mumbo jumbo? Maybe, but the main idea here is that these three methods are different from one another and will produce different results. Indeed, let's see what happens when we soft-proof this (sRGB) Granger chart using these three methods.
 A Granger chart created in the sRGB color space The images below show the Granger chart when soft-proofed with three profiles that I created for Epson Velvet Fine Art paper on my Epson Stylus Pro 3800. These profiles are based on the exact same measurement data, but each uses a different gamut mapping method. The perceptual rendering intent (without black point compesnsation) was used in all cases.
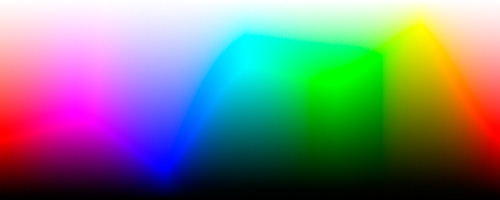
 Example conversion to the output (device) space using LOGO Colorful
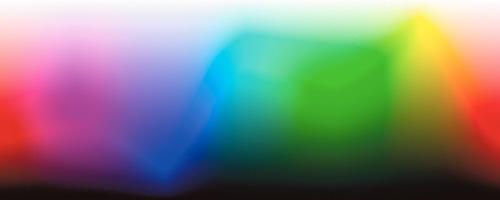
 Example conversion to the output (device) space using LOGO Chroma Plus
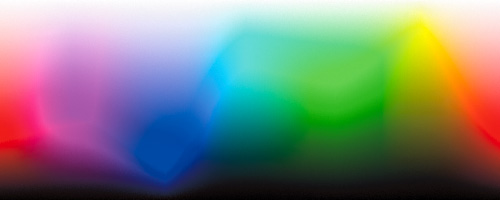
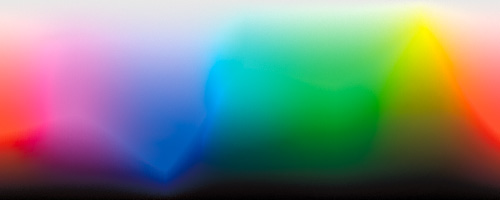 Example conversion to the output (device) space using LOGO Classic As you can see, there are clear differences in the result. The LOGO Colorful image is smooth in the blues and purples, but has a rough transition in the greens. The opposite seems to be true for the LOGO Chroma Plus image. The LOGO Classic Image seems to have the smoothest transitions overall, but it also has the least saturation. These types of tradeoffs are common when comparing perceptual gamut mappings recipes. No single method is perfect because many of the qualities we want compete with each other. The point here is that it's nice to have other options available when a given gamut mapping method isn't working well for a particular image. For example, if you used Eye-One Match to build a custom printer profile (using the default LOGO Colorful gamut mapping method) and you're not happy with the results for some of your images, you may want to give the other two gamut mapping methods a try. The steps below show you how.
The Config FileThe LOGO Chroma Plus and LOGO Classic gamut mapping methods are not accessible via the main Eye-One Match interface. To request Eye-One Match to use one of these methods, you need to edit the Config file that is located in the program folder. On Windows, this folder is usually:C:\Program Files\GretagMacbeth\i1\Eye-One Match 3 Under Mac OS X, you may need to first cmd-click on the Eye-One Match icon, select the Show Package Contents from the menu and then edit Contents -> MacOS -> Config. Open the Config file in a text editor (Notepad is fine) and add this line: GamutMappingMethod=NewGamutMapping L0.3 Save your changes. If Eye-One Match is running, you'll need to quit the program and restart it for your changes to take effect. From now on, Eye-One Match will build the perceptual tables in your ICC printer profiles using the LOGO Chroma Plus gamut mapping method. To request Eye-One Match to use the LOGO Classic gamut mapping method, follow the above instructions to change the Config file, but use this line instead: GamutMappingMethod=DefaultGamutMapping If you want to go back to using LOGO Colorful, simply delete the above line in the Config file.
One Measurement File, Multiple ProfilesBy editing the Config file as described above, you can generate multiple profiles (using different gamut mapping methods) from the same measurement data. You don't have to re-measure your printed target to create a new profile. This is a good thing; there is only so much time you can spend scanning targets before you go crazy. Fortunately, you can measure your target once using MeasureTool (see Part 2 of this page for instructions) and save the measurements to a text file. To build profiles using different gamut mapping methods from the same measurement data, edit the Config file appropriately, restart Eye-One Match, and load the saved measurement data.Real-World Example UsageLet's say you're making custom profiles for your favorite paper. You've followed the instructions above and built three profiles from the same measurement data, one for each of the three perceptual gamut mapping methods.Later, you're using Photoshop to prepare an image for printing on this paper. Let's say the image contains significant shadow detail and some saturated red colors, so you need to be careful that the shadow details are preserved and that the deep reds which lie out of gamut get remapped gracefully (instead of turning into featureless red blobs). You can preview and compare the results by soft-proofing. It's particularly helpful to study the critical parts of the image with the soft-proof dialog box open while you flip between the three profiles. Then you can pick the one that produces the most pleasing result and print with it.
|