
| 3 c. | flour | 1 c. | salad oil |
| 2 c. | sugar | 1 T. | vanilla |
| 1 T. | baking pdr. | 4 | eggs, lightly beaten |
| 1/2 t. | salt | 4 oz. | orange juice |
Mix dry ingredients. Mix wet ingredients. Mix dry and wet ingredients together. In a well-greased tube pan, layer half of batter, half of apples (see below), half of ~3 T. cinnamon sugar (one part cinnamon to one part sugar), rest of batter, apples, cinnamon sugar. Arrange top layer of apples nicely. Bake 1 hour and 10 minutes at 350°F.
| (from Sue's Omi, from some newsletter when she and Opa were stationed in Brazil in 1967–70) |
Note on apples [from the 1980s]: Canned apples are nicer (moister) than fresh ones. Use only pure, unadulterated apple slices (ingredients: apples, maybe water), NOT apple pie filling, which is sweetened. One can, ~20 oz., is enough for one cake. Reserve whole slices for top layer. Amendment [from the 2010s]: I haven't seen decent quality canned apples (or any quality) in a couple of decades. Two to four baking apples (Granny Smiths, say), peeled, cored, and sliced reasonably thickly, should suffice.
Unnecessary additional information:
This is a very forgiving cake. You don't need to use an electric mixer or sift anything, and as long as you mix the dry and wet ingredients separately first, it never lumps. I made it once in someone's ill-stocked kitchen with slightly overripe bananas in the middle layer, fresh peaches on top, brown sugar substituted for part of the white sugar, wheat flour for part of the white flour, and I think part olive oil, and it came out fine, if a little moist from the bananas and brown sugar (I should have increased the baking time five or ten minutes to compensate). I have also used canned or frozen peaches in place of apples and grapefruit juice instead of orange juice to good effect. Use your imagination!
You may also make this cake in single-thickness layers. Reduce the baking time somewhat. Use a toothpick to test for doneness (single or double layer). The cake is ready when the toothpick comes out with moist crumbs attached, rather than with batter. It's a moist cake so you needn't wait until the toothpick comes out clean, though the cake will still taste fine if you do—there's a lot of leeway in the baking time. Do not use a deep pan without a center hole, as the center will not cook, but bundt pans are acceptable.
To remove from the tube pan, let the cake sit five or so minutes. Then run a knife around the sides and tube and lift the cake and the center/bottom section of the pan out of the outer section of the pan. Run a knife under the bottom of the cake, and insert three spatulas or two long, wide knives (e.g., chef's knife and bread knife) between the cake and pan. Lift evenly, holding down the top of the tube with your third or fourth hand until the cake is free, and transfer the cake to a plate. It does not need to be cooled on a rack. If you don't have two people, or for some other reason have fewer than three hands, you may perform this operation with two knives or (preferably large) spatulas, two hands, and your chin on the tube. Be careful not to burn your chin on the tube. If using spatulas, work carefully to keep the cake from breaking in half. If the cake breaks, you may be forced to eat it yourself and bake another one, more's the pity. (Actually, if you just push the halves together, a simple break won't show.)
| —Sue |
| 1 1/4 c. | sugar | 4 T. | sour cream |
| 1/2 c. | butter | 1 t. | vanilla |
| 2 | eggs | 1 c. | banana, mashed |
| 1 t. | soda | 1 1/2 c. | cake flour |
Preheat oven to 350°F. Cream butter & sugar, add eggs, beaten very lightly, and soda, dissolved in sour cream. Beat well; then add bananas, flour, 1/2 t. salt & vanilla. Mix well. Bake in well-greased 8" by 8" pan for 30–35 minutes. Test for doneness with toothpick; if toothpick comes out with batter attached, is not done yet; if comes out with moist crumbs attached, is done; if comes out clean, is overdone. Frost if you want to, otherwise eat plain—a few chocolate chips scattered on the still-warm cake, left to soften five minutes, and then spread with a knife, makes a simple, tasty, and not overly caloric frosting. If there isn't enough banana, add apple sauce to fill the cup.
Half recipe makes 8 tall cupcakes.
| —The New Settlement Cook Book? |
Apples: 3 to 5 to fill a 9x9 glass baking dish, 1 for an individual pie (use a large-size = 10 oz. custard cup). Peel and core apples and slice them as thinly as you can stand—paper thin for a one-person pie, eighth inch if possible but no more than quarter inch for large pie. Layer 1/2 of apples in dish, then put in a few dabs of butter and dashes of cinnamon, then put in rest of apples and cover with:
Crust: 1 part butter to 1 part brown sugar to 2 parts flour. Use 1 c. flour for a 9x9 pie, 1/4 c. flour for an individual pie. Cut ingredients together. Either crumble onto top of apples and press to form crust or form into little plates in palm of hand and join these on top of apples.
Bake at 400°F for 1/2 hour to 45 minutes (individual pie takes closer to 20 minutes). To hasten cooking time for a large pie, you may nuke the pie a few minutes before applying crust and then bake until crust is brown. Serve with cheddar cheese or ice cream if desired.
| —Sue, from her mom, from her mother |
| 1/2 c. | butter | 1 1/2 c. | flour |
| 1 c. | sugar | 1 1/2 c. | chopped walnuts |
| 3 | egg whites, beaten stiff | 1 1/2 t. | baking powder, sifted into flour |
| 1/2 c. | milk |
Preheat oven to 350°F. Cream butter & sugar, add milk & flour alternately. Fold in egg whites (carefully) & nuts until evenly mixed. (Eggs will lose some volume when folded in.) Place in greased & floured loaf pan & bake for 45 minutes. (Nuts cut relatively large: 1/2 walnut into 12 pieces if fat, 6 if thin.) (Actually, 1/2 walnut into 9 pieces...)
Original recipe, New Settlement Cook Book p. 442, had only 3/4 c. chopped hickory meats & had 1 t. cream of tartar & 1/4 t. soda instead of baking pdr, added at end: “Butter, sugar, milk, flour, add eggs & nuts and beat (!) until smooth, then sprinkle over cream of tartar & the soda dissolved in 1 t. milk. Beat (!) & placed in g. & f. pan etc.” I think I used my “large” loaf pan 8 1/4"x4 1/4" on bottom instead of “small” loaf pan 7 1/2"x3 1/2" (approx. same height). “Tiny” loaf pans are 5 1/16"x2 1/8" & about 1/2 inch lower & each uses 1/3 recipe (I had to make 1 1/3 (4 egg) recipe for my 4 pans. (Brimful capacities 7 cups, 5 1/4 cups, 2 1/4 cups resp.)
| —Sue's exacting mother |
You can use the leftover yolks to make Chocolate Sabayon Pie (an extra yolk won't hurt) or Truffles.
| 1 c. | butter | ||
| 2 c. | sugar | Topping | |
| 2 | eggs | ||
| 1 c. | sour cream | 1/2 c. | chopped nuts |
| 1/2 t. | vanilla | 1/2 t. | cinnamon (generous) |
| 2 c. | flour | 2 T. | brown sugar |
| 1 t. | baking pdr | ||
| 1/4 t. | salt |
Fill bundt or tube pan: 1/2 batter, 1/2; topping, rest of batter, rest of topping. Bake at 350°F, 55-60 minutes. Cool before removing from pan, sprinkle with confectioner's sugar.
| —Cindy |
Once Colleen and I tried to make a checkerboard cake. She has some plastic parts for making a checkerboard-cake-in-the-round. She has two parts, each of which consists of two concentric circular bands of plastic connected by plastic running across the top. You put each one in a round cake pan and pour one color of batter into the inner and outer circle of one pan and the middle circle of the other pan, and the other color of batter into the middle circle of the first pan and the inner and outer circles of the second pan. Then you remove the plastic parts, bake the cake, and stack the two layers.
We made too much batter and also wanted to try making a square checkerboard cake, so we cut up some plastic into strips. The plastic was pretty thin and we didn't have any way to attach the strips to each other so we ended up playing Twister: two people held plastic strips in a pan while a third contorted around them, pouring in the batter.
Colleen and I used Banana Cake batter for the light cake and some standard boughten pudding-in-the-mix chocolate cake batter for the dark cake. Banana cake batter cooks slow and the chocolate cake batter cooked fast, so the former ended up a little underbaked and the latter rather overbaked. Also the chocolate cake batter rose while the banana cake batter sank. So our cross-section ended up with chocolate cake trapezoids on top interlocking with banana cake trapezoids on the bottom, rather than alternating rectangles of each, and the top of the cake had big mounds of chocolate cake separated by narrow troughs of banana cake. The chocolate cake fell apart when we tried to ice it, partly because it was a weak cake to begin with and partly because we overbaked it. The whole construction looked pretty bad but tasted great, and we decided we should have used all banana cake batter, only with half of it flavored and colored with chocolate.
We made this cake for Beth's first birthday, or maybe second, and there was a big snowstorm and hardly anyone came, so hardly anyone saw how misshapen and crumbled the cake was anyway. And it did taste good.
![]() Winner, "Most Original", 1996 MIT
AI Lab Olympics Bake-off
Winner, "Most Original", 1996 MIT
AI Lab Olympics Bake-off
Colleen gave me a marvelous book on cooking with chocolate. I haven't been able to find it, but I know it's around someplace. It contains a recipe for a chocolate cabbage, which I read through when she gave me the book, a good five years ago. I've seen the accompanying picture more recently; say, maybe three years ago. So when I decided to make the chocolate cabbage, I had to pretty much wing it.
First I made Banana Cake batter. I chose this batter because it tastes wonderful, and because it's strong and heavy, which is helpful in construction. I especially had in mind the structural failure of the checkerboard cake Colleen and I once made.
I made a double recipe (enough for two layers), which ended up being more than twice what I needed, so I ended up making Yin Yang Cupcakes from the leftovers. I reserved around half the batter and added cocoa and sugar to the remaining batter—maybe half a cup of cocoa powder and a little less sugar than that. (This turned out a bit dry. It would have been better if I'd added melted chocolate, either semi-sweet, or bitter plus extra sugar.)
I heavily greased the insides of two huge ceramic soup mugs that had nearly hemispherical bottoms and poured in some regular banana cake batter (sans chocolate). I heavily greased the outsides of two custard cups and nestled them in the batter in the soup mugs, so that the batter would bake into two hollowed out hemispheres. This batter rises a fair amount so I pushed the custard cups in fairly well and didn't use a whole lot of batter.
I took two more custard cups, heavily greased their insides, and poured in chocolate banana cake batter. I used too much batter and had to cut them down to size; see below.
I baked the two outer and the two inner hemispheres. They didn't need to bake for very long—maybe 15 minutes. But you should check with a toothpick in the usual manner for Banana Cake. About half way through, I took out the outer hemispheres, pushed their custard cups in further, and popped them back in the oven.
When the various parts were done, I removed them from the oven, let them cool for a few minutes (fivish) and then carefully removed them from their receptacles. The custard cups were easy to remove, inner and outer, but I had to work carefully with the soup mugs. I set the parts to cool thoroughly.
So here I was with the components of a spherical cake, composed of an inner sphere of chocolate banana cake and an outer sphere of regular banana cake, and I had to stick it all together. Just using icing seemed too boring so I bethought myself of the filling of Black Bottom Cupcakes, which comes out very tasty and a good consistency.
I started mixing it up and had just added the egg when I realized that I wasn't going to be baking this mixture which meant that
Oops.
So without adding the chocolate chips, I set the mixing bowl over a pot of hot water (instant double boiler) and cooked it over simmering water, stirring constantly, until it turned into a soft custard. (I was thinking of Chocolate Sabayon Pie when I did this.) Then I let it cool enough so it wouldn't melt the chocolate chips, added around 8 oz. of chips, and stirred.
I ended up with way too much filling so I mixed it into Chocolate Truffle mixture (I was also making Chocolate Truffles). It tasted pretty good—sort of like a cross between Chocolate Truffles and Chocolate Death Bombs. Still, I think I prefer unadulterated Chocolate Truffles.
 Constructing the Cake
I just sort of glooped some filling into each outer hemisphere, nestled the inner hemispheres in, glooped more filling over the face of each hemisphere, and stuck them together.
The inner hemispheres were way too tall. I had to slice their tops off with a knife. First, I had put too much batter in the custard cups. Second, I hadn't accounted for the filling taking up room. Banana cake is a good, solid cake, so when I chopped the cupcakes' tops off, they didn't fall apart at all. The inner hemispheres fit very nicely into the outer hemisphere, despite the filling. Also, the soup mugs had slightly flattened inside bottoms, so by stacking the hemispheres vertically, rather than horizontally, I ended up with a cake that rested very nicely on the table and didn't tend to roll or fall apart.
 Recipe? What recipe? Into the mixing bowl, bit by bit, went a
bag of powdered sugar, a stick of butter, and several tablespoons of milk.
I reserved some of this for the Yin Yang
Cupcakes. Then I added a bit of melted chocolate left over from
dipping marzipan candies (maybe an ounce or two), and somewhere between a
quarter and a half cup of cocoa powder. It didn't come out as dark as I
would have liked. Also I think I should have used more liquid. More fat
would have been good, too—more melted chocolate and less cocoa.
Recipe? What recipe? Into the mixing bowl, bit by bit, went a
bag of powdered sugar, a stick of butter, and several tablespoons of milk.
I reserved some of this for the Yin Yang
Cupcakes. Then I added a bit of melted chocolate left over from
dipping marzipan candies (maybe an ounce or two), and somewhere between a
quarter and a half cup of cocoa powder. It didn't come out as dark as I
would have liked. Also I think I should have used more liquid. More fat
would have been good, too—more melted chocolate and less cocoa.
Rather than icing the bottom of the cake, I plomped and flattened a glob of chocolate icing into a cake-bottom-sized round on the cake's final destination. (Well, really, I first iced the cake on a plate, then decided I needed a larger platter, to support the leaves, and transfered everything to a cookie sheet covered with tissue paper so it wouldn't look quite so ugly. I recommend using any nice looking, large platter.) I set the cake on the circle of icing and then iced the rest of the cake, smoothing the top icing to meet the glob underneath. I dipped the icing knife into hot water and ran it over the cake to smooth the icing, and I tried to make swirls that vaguely resembled cabbage leaves.
The leaves were pure, unadulterated chocolate. I melted chocolate chips in a double boiler, smeared it on cabbage leaves, cooled, peeled, and voilà!
You'll want more detail than that.
I went to a store and examined the cabbage supply. I wanted a cabbage with nice, sturdy looking, unripped leaves and with some outer leaves that curved back gently the way outer cabbage leaves do. The red cabbages looked better than the green ones but I don't know if that's generally the case or it was just that particular selection. I ended up buying a small red cabbage. I should have bought a slightly larger one. I had forgotten to take the icing into account, not to mention better the leaves should be too big than too small, since if they're too small they won't fit around the cabbage cake without breaking. Make sure you buy a cabbage that looks like it has enough good leaves. If you're careful, you can reuse the outer leaves, but it's difficult to impossible to reuse inner leaves. Keep in mind that you'll want to make a couple of extra chocolate leaves, in case some break.
Anyway, I cut around the stem some, carefully removed the outer leaves, that fold back, and carefully removed the three or four outermost inner leaves, that curl around the cabbage. Be very gentle when removing the inner leaves!
I carefully and thoroughly washed the cabbage leaves, gently patted them mostly dry with a clean towel, and rested them on a towel to finish drying. I then refrigerated them, since I prepared them a day in advance, but come to think of it, refrigerating them briefly regardless might not be such a bad idea.
I melted chocolate chips in a double boiler and smeared it on the cabbage leaves with a knife. For the outer leaves, I smeared the chocolate on the outside of each leaf, so that I would mold the cabbage leaf design on the inside of the leaf, which is the part you see when the outer leaves are arranged on the platter around the cabbage. After smearing, I draped each leaf over a round bowl—you know, a salad/cereal bowl the size that they expect you to eat cereal out of, not the humungous size people actually each cereal out of—on a plate. This failed to preserve most of the reverse curve of the outer leaves. I should have used a traditional wide, shallow soup bowl. The rim of the soup bowl would have supported the recurve rather nicely. Also, I smeared the chocolate over the whole leaf, but I shouldn't have. Leave the bottom third of the leaf blank, with the chocolate in a concave curve, so that when you arrange the leaf on the platter around the cake it can fit against but not under the cake.
For the inner leaves, I smeared the chocolate on the inside of each leaf, so that I would mold the cabbage leaf design on the outside of the leaf, which is the part you see when the inner leaves are curled over and around the spherical inner cake. I nestled each smeared leaf inside a round bowl. I should have used slightly larger bowl, but the next larger size I have is humongous, deep cereal/soup bowls, which aren't spherical enough; their cross-section is too hyperbolic. Well, anyway, do the best you can. Once again, I smeared the chocolate over the whole leaf, but I shouldn't have. Leave just a little of the base of the leaf unpainted so that when you arrange the leaf over and around the cake, you don't have to slip it under the cake.
As I finished coating each leaf, I stuck it in the fridge, resting in or on its supporting bowl as appropriate.
You can peel the leaves as soon as they're hardened (but I didn't; see below). I was only able to peel the inner leaves destructively—that is, I had to tear the cabbage leaves while peeling. When peeling inner leaves, you can hold the leaf from the outside, with your fingers touching the cabbage. When peeling the outer leaves, you again have to hold the leaf from the outside, which means you're touching chocolate. My leaves started to melt when I touched them, so I dumped some ice cubes into a bowl of water, dipped the fingers of my holding hand until they just started to hurt, dried them, and held the cabbage. I redipped my fingers as necessary during the peeling process.
I made half my leaves a day and a half early and the rest half a day early. The first batch I peeled and stuck back in the fridge when I made the second batch; the second batch I didn't peel until just before use. Neither of these methods worked too well. The big problem was that the chocolate discolored. You know how chocolate sometimes turns grey when it gets too cold. It still tastes fine but it looks pretty bad.
On top of that, I found that if I left the chocolate on the cabbage for several hours, the cabbage started leaking droplets of viscous cabbage juice onto the leaf here and there. I had hoped that the cabbage would protect the chocolate from discoloring from cold, but I don't see that trading greyness for cabbage juice is a big improvement.
And, finally, the chocolate was cold enough when I removed it from the fridge that water condensed on it.
Botheration.
In my circumstances, there was nothing I could do about all this. I needed to construct everything at home, transport it elsewhere, store it for several hours, and then do the final construction, and that meant refrigeration.
What I recommend is to construct the entire cake, icing and all, and to prepare the cabbage leaves by removing them from the cabbage and washing and drying them, all of this at your leisure. Before your guests arrive, get out your supporting bowls and plates, clear space in the fridge, and set out the chocolate chips, in the double boiler, on the stove, ready for you to turn the heat on. Then, half an hour or so before you want to serve the cake, set the chocolate to melting. When the chocolate is ready, paint your leaves, inner first, then outer, and set each to harden in the fridge as you finish it. Get your ice water ready. As soon as each leaf becomes hard enough, peel it and arrange it.
Your alternate plan is to figure out how to harden chocolate and keep it hardened, without discoloring it or letting it melt.
I used three inner leaves and three outer leaves. The inner leaves I curved around the spherical cake. Since I had painted the entire leaves, I had to break off a bit of their bases in order to fit them around the cake without having to slip their bottoms under, which would have broken them. I got the leaves to stick to the cake by just sort of pushing them into the icing. I ended up with a crack or two in the chocolate. I think I could have avoid the cracking if I'd made the leaves a little larger (which would have required a larger cabbage).
The outer leaves I arranged around the cake, facing up, resting on the platter. Since I had painted the entire leaves, I had to break off a fair amount of their bases in order to fit them around the cake without having to slip their bottoms under, which would have broken them. If you paint your leaves with proper concave-rounding edges, you should be able to arrange them around the cake touching the icing base or the bottoms of the inner leaves, so that people don't see that the leaves don't go all the way under.
Four outer leaves would have been better, but I decided to use my fourth outer leaf as a bowl for marzipan candies instead.
![]() Winner, "Best of Show", 1997 MIT
AI Lab Olympics Bake-off
Winner, "Best of Show", 1997 MIT
AI Lab Olympics Bake-off
This is pretty much the Baumkuchen recipe from the same book I got the Chocolate Cabbage idea from (I eventually found the book again), but a drawing of a Bûche de Noël in the Joy inspired me to add a branch and the marzipan fungi were my own depraved invention as was the method of presenting the whipped cream.
For the batter:
| 10 | eggs, separated | 2 T. + 1 t. | cocoa powder |
| 1 1/2 sticks | unsalted butter | large pinch | salt |
| 1 c. | sugar | ~3 T. | Chambord |
| 1 c. | flour | 1 t. | vanilla |
| 1/3 c. | cornstarch |
For the filling/icing:
| 1 lb. | semisweet chocolate chips |
| 1 stick | butter |
| ~4 T. | Chambord |
For the bark:
| 3-4 oz. | semisweet chocolate chips |
For the garnishes:
| 1 pt. | heavy cream |
| ~1 c. | powdered sugar |
| a few oz. | marzipan |
Make the chocolate bark. You can do this way in advance and store the bark. At any rate, make the bark before you start the cake. Melt chocolate chips over hot water, stir briefly until smooth, and turn them out on a counter or marble board. The book says to work the chocolate with a long, thin spatula, spreading and smoothing it, until it loses its gloss and turns flat in color. Then use the edge of the spatula at an angle to peel up wide curls in rough, barklike sections. I had limited success with this. But I got about a third of it to come up in reasonably curl-like shapes, and by placing the curls strategically and filling in with the rest, it all worked out.
Set the ingredients for the filling/icing in the bowl of a double boiler. The original recipe calls for "a strong flavoring essence" and suggests coffee; I used Chambord and omitted the 2 T. of water the book says to add. Also, the recipe book says to make the filling in two batches so it won't dry out but it never seemed to even start to dry out on me so I don't think there's any reason to do this.
Start the batter: Beat the egg yolks with an electric mixer until thick and pale (about 8 minutes). Cream the butter and 3/4 c. sugar in another bowl, then slowly mix in the egg yolks. Mix in the vanilla and Chambord. (Here the original recipe calls for vanilla and, optionally, light rum or cognac.) I did a test run on this cake a while back where I made a half recipe and didn't bother with the bark or garnishes. It came out too dry and a little lacking in pizzazz. So this time I added about two shot-sized sake glasses of Chambord, which I figure was 3 or 4 T. Other liqueurs would be good, too. (I considered using Amaretto instead, to go with the marzipan fungi, but a significant proportion of people don't like almond and I didn't want to risk getting assigned such a judge. I was expecting Chef Eric's entry to blow mine away on appearance, so I was trying to win on taste, where I'm at least playing in the same league. Too bad Eric wimped out.)
Sift together the flour, cornstarch, salt, and cocoa. (The original recipe called for 2 T. cocoa powder + 1 t. coffee powder but I don't like coffee. That little would probably just make the cake nicely bitterer, but I don't stock coffee.) Mix the dry ingredients into the other ingredients by hand.
Preheat the oven broiler. Start heating the water in the bottom of the double boiler but don't put the bowl of ingredients on yet.
In a clean, grease-free bowl, whip the egg whites until they start to thicken. Sprinkle on the remaining 1/4 c. of sugar and continue whipping the whites until they form stiff, but not dry, peaks. Stir a large spoonful of whites into the batter, then fold in the rest of the egg whites.
Spread one-quarter of the batter on an oiled or greased cookie sheet (technically, a jelly roll pan—you want the sort with a short raised side all the way around). (Mine are non-stick and I didn't have to oil them like the recipe book said to. But I wish I had stick cookie sheets; non-stick ones are so inferior, not to mention toxic.) I used a rubber scraper to spread the batter. Spread it as smooth as possible and be sure not to spread the batter thicker in the corners. Put the cake in the oven 5 to 6 inches under the element and broil for 1 minute. Turn the sheet if necessary to make the batter cook evenly. It's okay if a few brown spots appear but don't overcook the cake. Spread batter into the next cookie sheet while the previous layer is baking if you have time.
After removing each cake from the broiler, let it sit a minute, then run a knife around the edges of the cake. The book says to lift the edges, then turn the sheet over and gently let the cake drop loose from the pan (and reoil the pan for the next layer), but I peeled the cakes up from one end sliding a metal spatula under the edge to peel it up where it didn't peel up of its own accord. The cake was strong enough that having rolled it up loosely in freeing it from the sheet, I could lift it by hand to a towel. I stacked the cakes flat on top of each other, separated by clean towels, with another towel over the top, to keep them from drying out. Put the bowl of filling ingredients over the bottom of the double boiler when you think it's time, given how long the cakes will take. (I put a layer in, prepared the next, popped the first out and the second in, started decanting the first, popped the second out, finished decanting the first, decanted the second, spread the third, popped it in, put the filling over the double boiler, spread the fourth layer, swapped it under the broiler, started decanting the third layer, popped the fourth out, finished decanting the third, and decanted the fourth, whew! Then did the branch; see below.)
I was planning on cutting off a three inch wide end of one cake to make the branch, but as it turned out, I'd scanted the layers as I spread batter into the cookie sheets, and I had enough to spread an extra three inch wide strip at the end of a cookie sheet.
Mix the filling ingredients until smooth. Add a little water if it's too thick to spread easily. Spread a little filling on the thin strip for the branch and roll it up tightly. Set it aside. Spread filling on the first cake layer. Starting at a short end, roll it up tightly. (When I made the test cake, I didn't roll tightly enough and ended up with a big hole in the middle. That got me to thinking it might be nice to put something in the middle; maybe chocolate mousse or something. Or one could roll out marzipan really thin and roll it with the cake. Kind of like rainbow layer cookies. Maybe some other year.) As you reach the end of each layer, lay out the next layer, spread it with filling, and continue rolling. Always roll tightly (but not so tightly as to tear the layers) or the finished cake will end up with gaps. Spread a little less than a quarter of the filling on each layer, since the fourth "quarter" will have to coat the outside, both ends, and the branch. Plus you had to fill the branch when you rolled it, which used up a little at the beginning.
When you've rolled up all four layers, you should have about a 5" diameter roll. At this point the book says to coat the outside and one end and cut off the uncoated end at an angle; then lay the chocolate curls parallel to the log, sprinkle the log with powdered sugar, and serve with lightly whipped cream. I embellished on this:
I coated the bottom of the cake (the bottom being defined as the side where the last layer ends). Then I set the cake on its bottom (that is, seam side down) on a cookie sheet. (You can set it on any surface—you might want to try a cooling rack. It doesn't really matter except you want something it won't stick to too badly, so it'll be easy to transfer it later.) I bored a little hole at an angle and stuck the branch in. I cut off the very tip end of the branch before sticking it in to eliminate the thickness at the end. (No matter how evenly I tried to spread the batter, it always seem to end up just a little thicker at the edges.) I coated the branch and the rest of the log, except for one end. I cut off the uncoated end, sort of at an angle. I laid the chocolate curls parallel to the log, arranging the best curls prominently and the chunks of bark where they wouldn't be so obvious. Since my cut end wasn't at enough of an angle to properly show off the cake interior and since I didn't want to waste any cake, I decided to lay the cut-off end next to the end off the log, as if it had been sawn off and left where it fell. Then I collected up the necessary accoutrements and appurtenances and went in to work.
At work, I whipped the cream to stiff peaks, adding two big serving-spoonfuls of powdered sugar before I started whipping. Other kinds of sugar are okay, too, but since I needed powdered sugar for sprinkling anyway... Adjust the amount of sugar to taste. I spooned the whipped cream onto a cookie sheet (I don't have any nice platters—I suggest a silver platter if you have one), trying to mound it up more at one end. It was supposed to look like drifting snow. I set the log nicely on the whipped cream on the cookie sheet. I picked it up with my hands to transfer it—it was a little messy but not too bad. I laid the cut-off end down to show off the inside of the cake. I arranged a few remaining chocolate shavings around the bottom of the cake, where I hadn't put shavings before because I knew I would have to touch it there to transfer it. I drizzled the "snow" around the log with leftover chocolate shavings to look like leaf litter and rotting bark (mm, tasty!).
I made three kinds of marzipan fungus: a three-layer version of the
shelf kind (check out "Talent Station 1: To
Begin at the Beginning"), a pair of paddy straw mushrooms
(Volvariella volvacea in "Major Edible Mushroom
Species"), and a rather generic mushroom, the kind with a
spreading, sharp-edged cap, not a button cap (most like the mushroom in the
back in the picture of Agaricus bisporus, the "white edible
mushroom" in "Major
Edible Mushroom Species"). These are all easy to make by hand,
and in fact the way marzipan splits when you squeeze it makes the shelf
fungus and white mushroom look particularly realistic. I stuck the shelf
fungi onto the log as if they had grown in the shadow of the branch. I
arranged the paddy straw mushrooms cutely together and the other mushroom
off at the other side.  I flattened the mushrooms' bases a little so they
would stand up and hid the bases in the whipped cream "snow".
Then I sprinkled powdered sugar lightly over everything to look like new
fallen snow. You should only sprinkle a little on. In particular, don't
obscure the rings of the cut end.
I flattened the mushrooms' bases a little so they
would stand up and hid the bases in the whipped cream "snow".
Then I sprinkled powdered sugar lightly over everything to look like new
fallen snow. You should only sprinkle a little on. In particular, don't
obscure the rings of the cut end.
I'd say it took me about four hours all told, not counting shopping.
I wanted to add a little color—say, holly leaves and berries. I know how to mold chocolate on real leaves (see the Chocolate Cabbage) but holly leaves are poisonous. For the same reason, I didn't want to add an actual holly branch. Maybe one could color white chocolate and hand form it somehow? I don't know enough about working chocolate yet. Next year?
This cake is insanely rich. Serve in very thin slices, with whipped cream.
| —adapted by Sue from The Joy of Chocolate (ISBN 0-8120-4279-4) |
![]() Winner, "Best Visual
Presentation" and "Best Chocolate Cake", 2003 MIT AI Lab Olympics
Bake-off
Winner, "Best Visual
Presentation" and "Best Chocolate Cake", 2003 MIT AI Lab Olympics
Bake-off
I baked this cake a second time, for the 2003 AL Lab Olympics Bake-off. This time I presented it as a stump with marzipan squirrel.
Modifications were as follows.
Recipe: I flavored the cake and filling with creme de cassis rather than
Chambord.
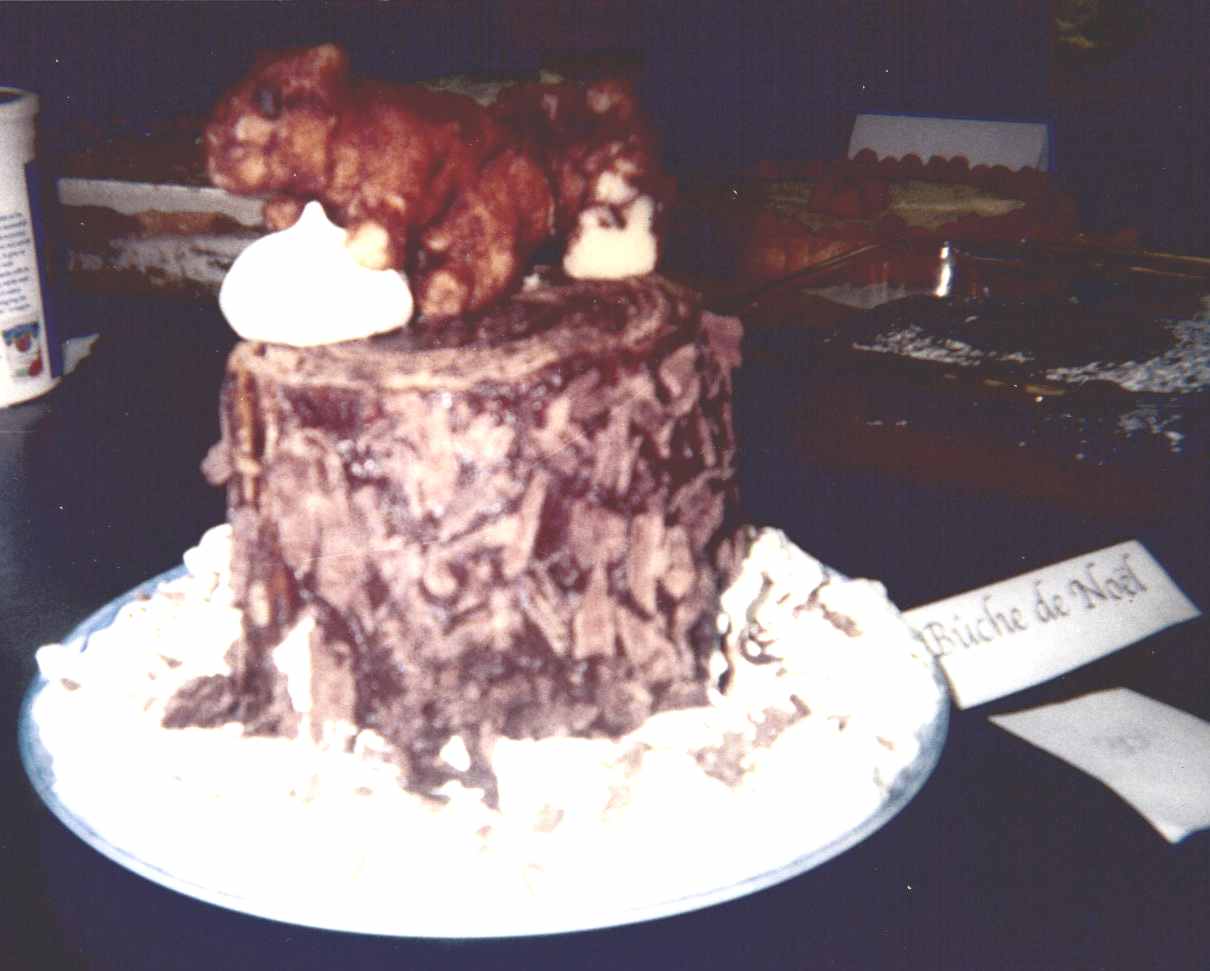
Cake construction: I cut each layer of cake in half in the long direction so that the resulting cake was half as long and somewhat fatter in diameter. This wasn't bad, but I wish I'd cut the cake in thirds. I was careful to put all the cut edges to the same side as I rolled the cake, with the aim of ending up with that end even and the other end slightly fatter, to imitate how a tree trunk flares out at the bottom. It only ended up flaring a tiny bit, but it looked pretty good anyway. I trimmed off the end with the cut edges to make it as straight as possible. I set it on its other end on a dinner-plate-sized serving plate and coated it with the remaining filling. I stuck chocolate bark on it.
Accoutrements: I made a marzipan squirrel: I unwrapped a tube of marzipan (actually, "almond paste"—the distinction between Droste marzipan and almond paste seems to be a couple percent difference in the almond-to-sugar ratio) and bent and squished it into a squirrel shape. It required very little manipulation. The tube shape mapped well to head-body-tail and I only had to push around bits to form arms and legs, and squish a little to make the shape of the head, ears, and haunches. For the tail, I formed it into a basic wet-squirrel-tail shape and then cut into it with a knife to "feather" it. I sliced many slices (one per half inch? quarter inch?) part way into it from front to back along the top, sides, and bottom. Where the slices overlapped, I let them crosshatch a little. The result was only slightly fluffy looking, but the best I could do. I mixed up brown food coloring according the directions on the package, diluted it with a bit of water, and painted it on the squirrel with a paintbrush. I used the sort you use for brushing eggwhite on things. In the past, I've used a very fine paintbrush to paint marzipan flowers, but the squirrel was a hack job and didn't need precision. My hands got all brown, but the food coloring mostly came off with a quick wash. For eyes, I broke apart a chocolate chip and used a couple of small pieces, molded in my fingers to make them rounder. I set the squirrel on the stump. The tail was much too heavy to stand up in the air. It broke off and I stuck it back on (and refeathered and repainted a bit). So I made the squirrel stand with its forelegs on something and bent the tail so that it went up, but then back down so that it could rest on the cake. I should have had the squirrel stand on a large nut, say a walnut in shell, but I didn't have one so I used a (gasp!) store-bought meringue kiss. I whipped some cream and spooned it around the cake, and sprinkled leftover fragments of chocolate bark here and there on the whipped cream.
| Sue |
| 1 | 10" baked pastry shell | 3 T. | crème de cacao or other choc. liqueur |
| 10 oz. | semisweet chocolate | 2 T. | dark rum (or vanilla or any liqueur) |
| 1/4 c. + 2 T. | water | 1 1/2 c. | heavy cream |
| 2 | egg yolks | whipped cream for garnish, optional | |
| 1 T. | sugar | choc. shavings for garnish, optional |
Prepare pastry shell and let cool.
Combine chocolate and water in double boiler and melt.
As chocolate mixture melts, place egg yolks, sugar, and crème de cacao in a double boiler over barely simmering water. Beat vigorously with a wire whisk until sauce becomes rich and thick, like a stiff custard. Increase heat slightly if necessary.
Let the melted chocolate cool slightly (if it is too hot when added to the sauce, it will tend to cook the eggs). Add the chocolate to the sauce, folding it in with a plastic spatula. Beat in the rum.
Whip the heavy cream until stiff. Fold in the chocolate mixture. Spoon the combination into the baked pastry shell and chill. Serve cold. Garnish with additional whipped cream and chocolate shavings if desired. Serves 8 or more.
If you use an extra egg yolk, you can use the leftover whites to make “Hickory Nut” (Walnut) Cake.
| —Sue's Mom |
| 2 T. | sugar | 3/4 t. | salt |
| 12 T. | butter | 1 | egg |
| 1 T. | milk | 2 1/2 c. | flour |
Place sugar and salt in an electric mixer or food processor. Gradually add the butter, blending constantly.
Beat in the egg, milk, and flour.
If you aren't using the dough right away, gather it into a ball and wrap it in foil or plastic wrap. Refrigerate until ready to use.
Preheat over to 425°F.
Roll out the dough and line a 10-inch pie tin with it, pricking the dough with a fork. Bake 20 minutes. Let cool.
I usually roll the dough out thin enough that I have lots of extra dough, enough to fill a few custard cups or tart tins and sometimes even enough for a second pie crust. I find the pie crust usually only needs to bake 10 or 15 minutes.
This crust shrinks drastically when baked! Prick the dough well and lap the dough over the edge of the pie tin as much as feasible.
| —Sue |
Make Banana Cake batter and flavor half with melted chocolate to taste (or with bitter chocolate and sugar, or even with cocoa and sugar, but that's a bit dry). Grease cupcake tins. Make marble cupcakes: Drop a glob of plain batter and a glob of chocolate-flavored batter into each cup. Vary how you do it. You can put one glob to each side, one glob on top of the other, whatever. Swirl a chopstick once or twice around each cup to mix the batters a little. Bake.
Make chocolate and plain white icing. Ice each cupcake in the shape of the yin-yang symbol. Put the white icing on each cupcake first, to reduce smearing. Put on the white icing and shape it a little. Put on the chocolate icing and shape it a little. Dip the white-icing knife in hot water and simultaneously smooth and finish shaping the white icing. Dip the chocolate-icing knife in hot water and simultaneously smooth and finish shaping the chocolate icing. Shape and smooth additionally if necessary.
Use chocolate chips and vanilla chips to form the seeds of yang within yin and yin within yang. Put the chips on upside-down, so that they appear as dots. If you can't find vanilla chips, use butterscotch, I guess. The vanilla chips I found were really tall so I broke their tops off before turning them upside-down and pressing them in.
| Combine: | 8 oz. | cream cheese | 1/3 c. | sugar |
| 1 | beaten egg | 1/8 t. | salt | |
| Beat well & stir in: | ||||
| 12 oz. | chocolate chips (mini chips) | |||
| Set aside. | ||||
| Sift: | ||||
| 3 c. | flour | 1/2 c. | cocoa | |
| 2 c. | sugar | 2 t. | baking powder | |
| Add to dry ingredients: | ||||
| 2 c. | water | |||
| 2/3 c. | cooking oil | |||
| 2 T. | vinegar | |||
| 2 t. | vanilla, heaping | |||
| Beat well. |
Fill tiny cupcake liners with last mixture, about 1 T. Then drop 1/2–3/4 t. first mixture on top of each. Bake at 350°F for 20 min (can be tested w/ toothpick in cake batter portion). Use small muffin tins & tea size liners only (easiest to find at Christmas time). These cupcakes may be frozen.
| (from Sue's Mom) |
Actually, middling small muffin tins, one size smaller than standard, are okay, too. Just don't use full-size ones.
Made these June 26, 1996, and got best results from filling liner half way up with batter, dropping in 3/4+ t. filling mixture, and baking 17-18 minutes at a little over 300°F. Recipe made ~100 cupcakes.
| Sue |
This cake recipe is from "First Catch your Hare ...": The Art of Cookery made Plain and Easy by Hannah Glasse, from Prospect Books, ISBN 0907325580, which is a facsimile of the 1747 publication of The Art of Cookery made Plain and Easy by a Lady. It is my favorite original 18c cookbook. Here's the recipe:
A Rich Seed Cake, called the Nun's Cake.
Take four Pound of your finest Flour, and three Pound of double refin'd Sugar beaten and sifted, mix them together, and dry them by the Fire till you prepare your other Materials; take four Pound of Butter, beat it with your Hand till it is soft like Cream, then beat thirty-five Eggs, leave out sixteen Whites, and strain off your Eggs from the Treds, and beat them and the Butter together till all appears like Butter. Put in four of five Spoonfuls of Rose or Orange-flower Water, and beat again; then take your Flour and Sugar, with six Ounces of Carraway Seeds, and strew it in by Degrees, beating it up all the time for two Hours together. You may put in as much Tincture of Cinnamon or Ambergrease as you please butter your Hoop, and let it stand three Hours in a moderate Oven. You must observe always in beating of Butter to do it with a cool Hand, and beat it always one Way in a deep Earthen Dish.
My adaptation (as sent to a friend):
Measure out a pound of flour and three-quarters of a pound of sugar and put aside. It doesn't matter whether you premix them or leave them separate. Beat one pound of butter in a mixer at a medium high speed until it looks like cream. This will take at least two or three minutes and may take as much as five minutes. It's helpful to have a powerful mixer that you don't have to hold constantly; for example, a Kitchen Aid mixer. Add 5 whole eggs, lightly beaten (or 7 yolks and 3 whites if you prefer). I find the eggs won't mix well unless I add a spoonful or two of flour (take this out of your previously measured flour). Beat the butter and eggs until they look like butter; this may take as much as another five minutes. Add a tablespoon of orange flower water (or rosewater). Add (the rest of) the flour and the sugar in several batches. Beat well (another two or three minutes). Optionally, add either one and a half ounces of caraway seed or some dried currants dusted in flour so they don't stick together or sink (I've never measured the currants—perhaps half a cup or a cup?) and beat just enough to mix. The batter should be too stiff to pour, but quite lightweight. Turn the batter into two 8″ round baking pans, two loaf tins, or any other pans. You don't need to grease the pans. Spread it reasonably evenly in the pans. Bake one hour at 300 degrees Fahrenheit.
Notes on how I adapted the cake recipe: I make a quarter recipe which fits in two 8″ rounds or two loaf tins. Have you heard of Martha Washington's Booke of Cookery? It's really 16th c. and 17th c. recipes and is only named after Martha Washington because she was the most famous person ever to own the book. The recipes are too old to be very useful for 18th century cooking, but Karen Hess's preface and annotations are invaluable—I use the book as a glossary of early ingredients and methods, and conversions. At any rate, according to Karen Hess, an 18c egg is about as large as a modern "small" egg. A "small" egg is about three-quarters the size of a "large" egg. So a quarter of 35 18c eggs (less 16 whites) is about 7 yolks and 3 whites, or 5 whole eggs. Rosewater is the vanilla of the 18c, but it's a bit of an acquired taste. Nobody seems to mind orange flower water, so I usually use that. You can get it in Armenian markets, like the ones in Watertown. You might be able to get it in other ethnic food stores, or possibly Whole Foods. King Arthur sells it as "Flower Water - Orange Blossom". You can get rosewater in many of the same places, plus any Indian food store (where it's cheap), plus many health food stores (where it's expensive, and make sure it's food grade). I think the bit about baking three hours in a moderate oven is a mistake; one hour plus at 300 °F works well for me, or one hour minus at 325 °F. Why currants instead of caraway? While a lot of people love caraway, a lot of other people hate it. Hardly anyone dislikes currants, so it's safer for an unknown crowd, and like caraway, it's a flavoring used in the 18th century.
See the Trifle recipe for a fancy way to use this cake.
| Sue |
Made for a pumpkin pie tasting at CSAIL, October 2014. The recipe is an amalgamation of what it says on a can of pumpkin, what the Joy says, and a recipe a friend told me about that uses dried pumpkin reconstituted in cream.
| For the filling | |
|---|---|
| 1 | eating pumpkin (sugar pumpkin, from farmstand) |
| 1½ c. | heavy cream (organic) |
| 2 | eggs (local, cage-free but not pastured) |
| ¼ c. | brown sugar (organic) |
| ½ c. | white sugar (organic) |
| 1 t. | cinnamon (korintja) |
| ½ t. | powdered ginger |
| ¼ t. | ground allspice |
| ⅛ t. | ground clove |
| For the crust (oops, this was enough for 1½–2 crusts): | |
| ½ lb. | flour (organic whole wheat pastry) |
| ⅓ | butter (organic unsalted) |
| pinch (⅛ t.?) | salt |
| ¼ c.?? | ice cold water |
Prepare the pumpkin: Cut a pumpkin in half stem to stern, clean out the guts, and bake the halves, cut sides down, about an hour at 325°F until soft. (You can pull most of the guts off the seeds, rinse them a little, and toast them on a cookie sheet while you're baking the pumpkin. Turn them once or twice and keep an eye on them because there's a very fine line between toasted and burnt.) A great way to make a pumpkin pie is to dry out the flesh into pumpkin leather (which you can then store for months) and reconstitute it with cream, which makes a richer, more intensely flavored pie. You make pumpkin leather by spreading the mashed flesh thin and setting it outdoors on a dry day or in the oven on low, but it takes several hours to dry. So instead, I scooped out the flesh into a couple of layers of cheesecloth and squeezed out as much juice as came out without too much trouble, and then boiled down the juice to get rid of most of the water and mixed the thickened juice back into the flesh, mashing well enough to remove any large lumps. (Nine oz. juice boiled down to 1½ oz. mixed into 10½ oz. flesh = 12 oz. total. That's ounces avoirdupois, not fluid ounces.)
Make the filling: Mix by hand the pumpkin, cream, eggs beaten lightly, sugar, and spices.
Make the crust: Cut a stick of butter into the flour, finely. Cut the rest of the butter (3 T.) into the flour, coarsely, until the largest pieces are as big as peas. Make a well in the center and sprinkle in most of the water. Fluff in the water with two forks—do not stir. Add more water if it seems like there isn't enough, but this is hard to judge since you haven't stirred the dough. Turn out the dough, which will have lots of dry and crumbly bits and won't hold together, onto a floured board. Push the dough roughly together into a flat-topped pile and mix it by smearing down the side of the pile with the heel of your hand. Do this all around the pile, until the dough holds together—if absolutely necessary, you can sprinkle a little more water in, but don't let any water run onto the board or it'll make a sticky mess and you won't be able to roll out the dough without cleaning up the board first. Gently lift the dough out of the way and sprinkle lots of flour on the board, the rolling pin, and your hands. Set the dough in the center of the board and roll out, always working from the center of the dough outward. If the dough starts to stick on the pin, rub off any dough that's stuck and rub more flour on the pin. Roll out the dough thin. When done, roll it up on the pin or fold it in quarters so that you can transfer it to the pie pan without it tearing. Spread it out in the pie pan and cut off the excess by running a knife around the edge of the pan.
Pour the filling into the crust and bake at 425°F for 15 minutes, then 325°F for 40 minutes or until a knife inserted comes out clean. Cool on a rack.
I used a 9″ pie pan of old Pyrex. The filling ran a hint short, so I trimmed down the crust a quarter inch. If you have too much filling, make a second pie in a tart pan with the leftover crust; it'll bake faster so start checking it for doneness after half an hour. If you have leftover crust, eat it raw (yum). Or roll it up with cinnamon sugar, slice it into rounds, and bake them for around a quarter hour. Or make the first carrot pudding recipe (yum!) from The Art of Cookery made Plain and Easy by a Lady (facsimile of the 1747 publication available as "First Catch your Hare ...": The Art of Cookery made Plain and Easy by Hannah Glasse, from Prospect Books, ISBN 0907325580; recipe on line at the World Carrot Museum) using the pie crust in place of puff paste, only use half the bread because it's nicer that way, and cut the other ingredients accordingly: 6 eggs less 3 whites, ⅔ c. sack (substitute medium sherry), ⅔ c. cream (or rather ½ c. because that's all you'll have left over from the pint of cream you no doubt bought for the pumpkin pie), 6 T. butter (that's half the proportion Hannah Glasse calls for; I'd ask "what was she thinking?!" only of course she was just copying from earlier recipes), ~⅔ t. ground nutmeg, and 1 T. orange flower water (Hannah Glasse also calls for too much nutmeg and orange flower water). I know, I know, this has nothing to do with pumpkin pie but it's a delicious carrot pudding and you should make it sometime.
Verdict: The filling had a wonderful light mouthfeel despite being made with the same quantities of ingredients as on the side of a typical can of pumpkin. Perhaps this is due to using sugar pumpkin instead of whatever squash they put in cans? The filling wasn't smooth since I mashed the pumpkin by hand rather than machine, but it was a pleasant texture nevertheless. The flavor was good, but it could have used more spice. The crust had a pretty bad texture, even though I didn't refrigerate the pie after baking it. I meant to use cider vinegar in place of part of the water, but I forgot. Pie crust gets tough if you overwork it and develop chains of gluten. There are three ways to get a tender crust: get it right in the first place, let it chill in the fridge until the gluten relaxes, or beat it with a rolling pin until you break up the gluten. I aimed for the first one and missed.
Appetizers | Soups | Salads | Main Dishes | Vegetables | Breads, etc. | Cakes and Pies | Cookies | Other Desserts | Drinks | Thanksgiving Dinner | Spice Advice | Colophon | Copyright
Back to Favorite Recipes of the Menagerie.
Last modified Dec. 9, 2025, Sue Felshin